In this tutorial I show you how to make Windows Media Player play Blu-rays on Your PC or Portable Devices.

Windows Media Player supports nearly all types of media files. However, many video formats are not included, such as Blu-ray, are proprietary and typically require a royalty payment in the form of a license to its owner. In order for Microsoft to include support for Blu-ray discs, it would have to pay Sony a royalty, which would likely mean passing on that cost to consumers. Instead, Microsoft chooses to let the consumer decide on whether to pay to use Blu-ray technology.
“Hey Guys,
Is there anything I can download so I can play my Bluray movies using Windows Media Player?
WINDOWS MEDIA PLAYER only.. if possible” – MitchellEve
“I’ve seen a few threads around here talking about using Windows Media player to play Blu RayDiscs. I am well aware of the whole “Windows doesn’t support Blu Ray” thing and Cyberlink’s software (the stuff that came with my Blu Ray drive) doesn’t always work for me. I have trouble playing certain discs using it.
How are you guys getting Media player to play these discs? Is there a plugin I can buy somewhere?
Thanks!” – NYTrojan
As we all know, playing Blu-ray disc on Windows must require an external Blu-ray drive to mount the contents on disc.
If you want to watch Blu-ray movies on Windows Media Player directly without a Blu-ray player, here are some very easy solutions for you:
In order to enable the windows media player to play audio or video formats that are not included in the operating system by default, you would have to obtain the necessary codecs. The media player codec pack website defines a codec as follows:
“A codec is a piece of software on either a device or computer capable of encoding and/or decoding video and/or audio data from files, streams and broadcasts. The word Codec is a portmanteau of ‘compressor-decompressor’.”
A popular solution for many people is to download and install a codec pack which includes the codecs necessary for playing many mainstream audio and video file formats. The mediaplayercodecpack.com website offers a popular codec pack for Windows media player that includes a number of popular codecs, including support for Blu-ray, which will allow you to watch your Blu-ray movies using Windows media player. You can download the codec pack on CNET’s website or you can go directly to www.mediaplayercodecpack.com.
As an alternative, you can use the VideoLAN program, which is also known as the VLC Media Player. The VLC media player is an open source program developed by the VideoLAN organization. The VLC Media Players comes with a large library of audio and video codecs pre-installed. For some people, this option serves as an alternative to using the windows media player which needs to be manually upgraded and tweaked in order to play certain file types.

The other option, is to simply install Pavtube BDMagic – a commercial, closed-source Blu-ray Ripping software that will play all of your upencrypted or encrypted Blu-ray and DVD discs.
With this ripping tool, you can lossless backup the Blu-ray with exactly the same file structure; rip Blu-ray to Windows Media Player highly compatible WMV videos, so that you can playback in Windows Media Player without scratching discs or using the disc drive frequently. What’s more, you can also rip Blu-ray to other popular video formats like MP4, M4V, MKV, AVI, MOV, VOB, MPG, 3GP, FLV, SWF, F4V, etc. bypassing the AACS and BD+ copy protection. Besides, you can extract audio from the Blu-ray movies: MP3, AC3, WMA, M4A, WAV, OGG, AAC, MKA, MP2, AIFF, FLAC, etc. audio formats are supported.
Just get it now and follow the guide below to rip Blu-ray for playing in Windows Media Player. (Read more: Online user manua)
Steps:
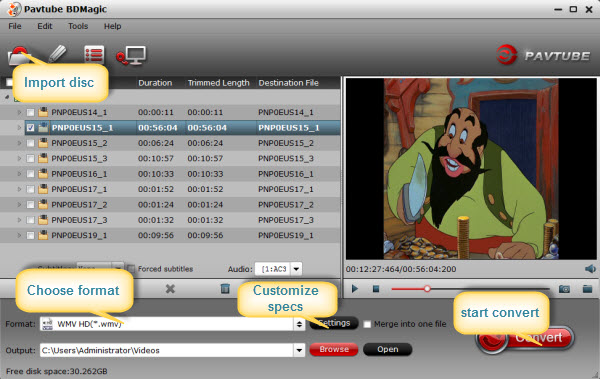
1. Load Blu-ray movies.
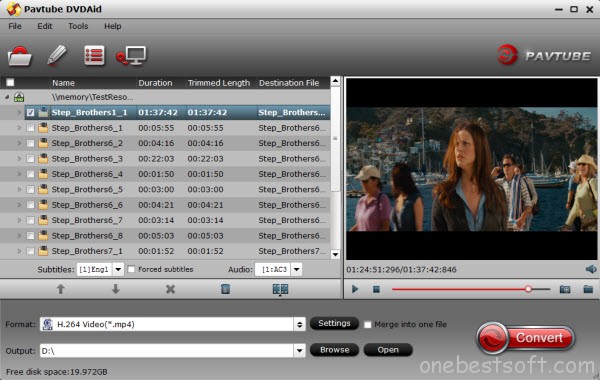
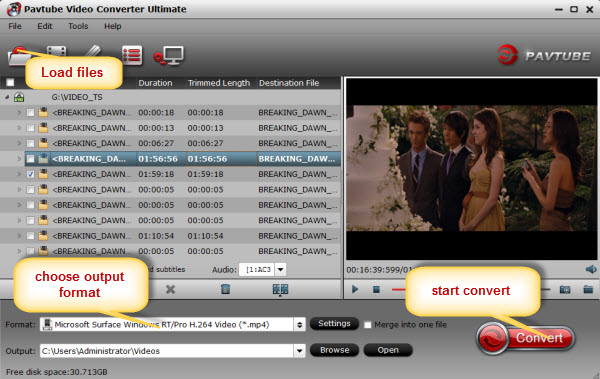
Insert the Blu-ray disc to Blu-ray drive. Download, install and open the Blu-ray to Windows Media Player Ripper. Click “Load File(s)” button on the main interface of program to load your Blu-ray movies. As you can see, you can view the movie on the right viewing window and take snapshots of the movie scenes.
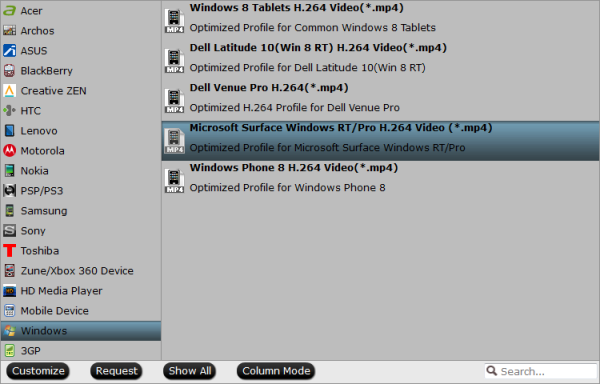
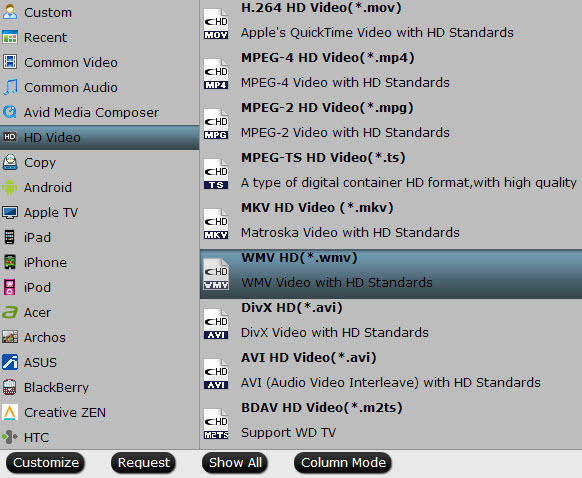
2. Select output format for Windows Media Player.
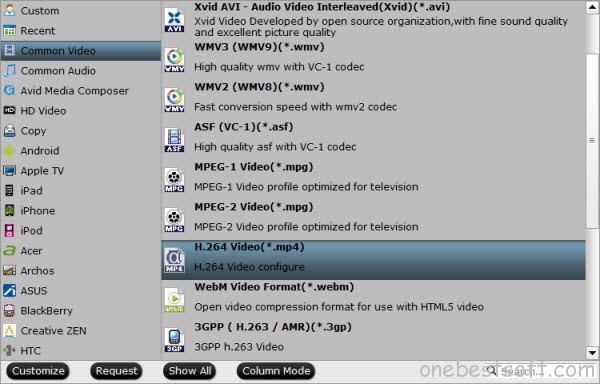
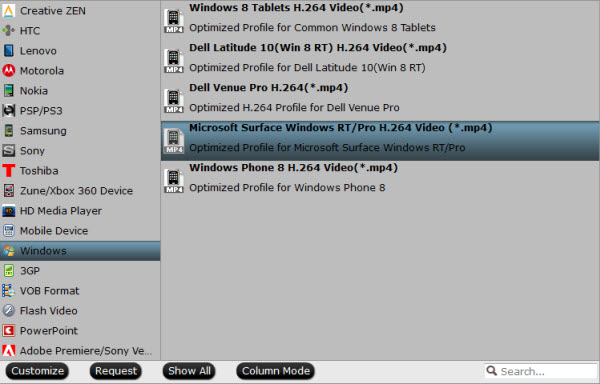
Click “Format” > “Common Video” and choose “WMV” as the output format, or click “Format” > “HD Video” and choose “WMV HD(*.wmv)” as the output format. And set the output saving folder by clicking “Output” and choose a folder to save the ripped files.
3. Start the Blu-ray to WMV conversion
Finally, click the “Convert” button to start ripping Blu-ray movies to WMV for playing in Windows Media Player. The ripper can help you finish the task soon, to save your time and work.
When the conversion finishes, you can click “Open” button to get the final output files. Open Windows Media Player and then add items to the Windows Media Player Library for playback.
Tips for ripping Blu-ray movies to Windows Media Player:
1. Select desired subtitles and audio track: Click the drop-down list of “Subtitle”, then all the subtitle info in the Blu-ray will be displayed for you to select. To select your desired audio track, just click the pull down menu of “Audio”, and then the popup drop-down list will give you the detailed information of all audio tracks, including language, audio codec, and stream ID.
2. Join BD/ DVD chapters into one: If you would like to rip the whole movie into one file, select all the Titles and check the box “Merge into one”.
3. Maintain 5.1 surround sound: Click “Settings” and select “5.1 channels” in the drop-down list of Audio Channels.
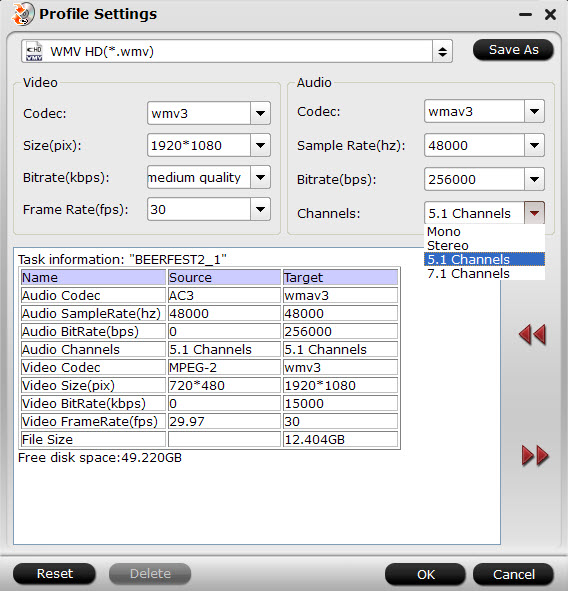
4. Keep audio and video sync: To get perfect A/ V synchronization, you need pay attention to frame rate when ripping BD/ DVD movies to Windows Media Center. You can click on “Settings” and try with different frame rate, like 30fps, 29.97 fps, 25fps, 24fps, etc. “Original” is not recommended.
5. Set auto shutdown: Once “Convert” button is clicked, ViewLog pops up. You may check “Shut down computer after conversion” in the ViewLog before conversion starts.
For general information about Blu-ray disc technology, take a look at the Blu-ray disc association website.
See Also:
Windows Media Player supports nearly all types of media files. However, many video formats are not included, such as Blu-ray, are proprietary and typically require a royalty payment in the form of a license to its owner. In order for Microsoft to include support for Blu-ray discs, it would have to pay Sony a royalty, which would likely mean passing on that cost to consumers. Instead, Microsoft chooses to let the consumer decide on whether to pay to use Blu-ray technology.
“Hey Guys,
Is there anything I can download so I can play my Bluray movies using Windows Media Player?
WINDOWS MEDIA PLAYER only.. if possible” – MitchellEve
“I’ve seen a few threads around here talking about using Windows Media player to play Blu RayDiscs. I am well aware of the whole “Windows doesn’t support Blu Ray” thing and Cyberlink’s software (the stuff that came with my Blu Ray drive) doesn’t always work for me. I have trouble playing certain discs using it.
How are you guys getting Media player to play these discs? Is there a plugin I can buy somewhere?
Thanks!” – NYTrojan
As we all know, playing Blu-ray disc on Windows must require an external Blu-ray drive to mount the contents on disc.
If you want to watch Blu-ray movies on Windows Media Player directly without a Blu-ray player, here are some very easy solutions for you:
In order to enable the windows media player to play audio or video formats that are not included in the operating system by default, you would have to obtain the necessary codecs. The media player codec pack website defines a codec as follows:
“A codec is a piece of software on either a device or computer capable of encoding and/or decoding video and/or audio data from files, streams and broadcasts. The word Codec is a portmanteau of ‘compressor-decompressor’.”
A popular solution for many people is to download and install a codec pack which includes the codecs necessary for playing many mainstream audio and video file formats. The mediaplayercodecpack.com website offers a popular codec pack for Windows media player that includes a number of popular codecs, including support for Blu-ray, which will allow you to watch your Blu-ray movies using Windows media player. You can download the codec pack on CNET’s website or you can go directly to www.mediaplayercodecpack.com.
As an alternative, you can use the VideoLAN program, which is also known as the VLC Media Player. The VLC media player is an open source program developed by the VideoLAN organization. The VLC Media Players comes with a large library of audio and video codecs pre-installed. For some people, this option serves as an alternative to using the windows media player which needs to be manually upgraded and tweaked in order to play certain file types.
The other option, is to simply install Pavtube BDMagic – a commercial, closed-source Blu-ray Ripping software that will play all of your upencrypted or encrypted Blu-ray and DVD discs.
With this ripping tool, you can lossless backup the Blu-ray with exactly the same file structure; rip Blu-ray to Windows Media Player highly compatible WMV videos, so that you can playback in Windows Media Player without scratching discs or using the disc drive frequently. What’s more, you can also rip Blu-ray to other popular video formats like MP4, M4V, MKV, AVI, MOV, VOB, MPG, 3GP, FLV, SWF, F4V, etc. bypassing the AACS and BD+ copy protection. Besides, you can extract audio from the Blu-ray movies: MP3, AC3, WMA, M4A, WAV, OGG, AAC, MKA, MP2, AIFF, FLAC, etc. audio formats are supported.
Just get it now and follow the guide below to rip Blu-ray for playing in Windows Media Player. (Read more: Online user manua)
Steps:
1. Load Blu-ray movies.
Insert the Blu-ray disc to Blu-ray drive. Download, install and open the Blu-ray to Windows Media Player Ripper. Click “Load File(s)” button on the main interface of program to load your Blu-ray movies. As you can see, you can view the movie on the right viewing window and take snapshots of the movie scenes.
2. Select output format for Windows Media Player.
Click “Format” > “Common Video” and choose “WMV” as the output format, or click “Format” > “HD Video” and choose “WMV HD(*.wmv)” as the output format. And set the output saving folder by clicking “Output” and choose a folder to save the ripped files.
3. Start the Blu-ray to WMV conversion
Finally, click the “Convert” button to start ripping Blu-ray movies to WMV for playing in Windows Media Player. The ripper can help you finish the task soon, to save your time and work.
When the conversion finishes, you can click “Open” button to get the final output files. Open Windows Media Player and then add items to the Windows Media Player Library for playback.
Tips for ripping Blu-ray movies to Windows Media Player:
1. Select desired subtitles and audio track: Click the drop-down list of “Subtitle”, then all the subtitle info in the Blu-ray will be displayed for you to select. To select your desired audio track, just click the pull down menu of “Audio”, and then the popup drop-down list will give you the detailed information of all audio tracks, including language, audio codec, and stream ID.
2. Join BD/ DVD chapters into one: If you would like to rip the whole movie into one file, select all the Titles and check the box “Merge into one”.
3. Maintain 5.1 surround sound: Click “Settings” and select “5.1 channels” in the drop-down list of Audio Channels.
4. Keep audio and video sync: To get perfect A/ V synchronization, you need pay attention to frame rate when ripping BD/ DVD movies to Windows Media Center. You can click on “Settings” and try with different frame rate, like 30fps, 29.97 fps, 25fps, 24fps, etc. “Original” is not recommended.
5. Set auto shutdown: Once “Convert” button is clicked, ViewLog pops up. You may check “Shut down computer after conversion” in the ViewLog before conversion starts.
For general information about Blu-ray disc technology, take a look at the Blu-ray disc association website.
See Also:
- Watch Blu-ray ISO to Windows Media Player
- Best way to Transfer DVD discs to Windows Movie Maker
- Top Windows 8.1 Video Converter: Convert HD videos on Windows 8.1
- How to Play DVD in Windows Media Player easily?
- Convert ISO files to MKV in both English and Hebrew audio
- Convert MPEG-4 to Prores 422 for Final Cut Pro Editing
- Convert MKV files to iPad Air 2/iPad Mini 3 for Playing
- 50% OFF Pavtube iMedia Converter for Mac on 2015 Easter Crazy Discount
- HD Videos to Galaxy A7 - Play All kinds of movies on Galaxy A7