How to Edite iPhone 7 (4K) Video in Adobe Premiere Pro

iPhone 7 video to Adobe Premiere Pro issues

Q1: Having trouble with iphone 7 videos with premiere pro CC

I can’t take my iPhone 7 videos (.mp4) and load them into the timeline. Any suggestions why this is happening?

Q2: iPhone 7 Video – Serious Sync Issues Eliminate Premiere as a tool

I was excited to see how great the video is from the iPhone 7. I have taken one hour 4k videos of lectures that look great. However, when pulled into Premiere (CS5), the sound goes out of sync to the point that it is unusable after about seven minutes. I have checked the original file (.MP4) using QT – it plays perfectly. Indeed, I can trim and split the file using QT and I know that creating a bunch of small videos to link in Premiere would be a solution of sorts.

Why can’t Import iPhone 7 MP4 video into Adobe Premiere Pro?

Can’t import your iPhone 7 MP4 file to Adobe Premiere Pro CS4/CS5/CS3/CS6? The iPhone 7 records in MPEG-4 and outputs its files as .MP4 files (the container). Files are compressed using the h.264 codec (as opposed to AAC or Xvid and DivX usually found in .AVI containers). So the files you are getting out of iPhone 7 are suited to be delivered as is, which is usually not what you want. So sometimes our iPhone 7 MP4 file codec isn’t compatible with Adobe Premiere. To easily solve your problem, you can convert this iPhone 7 MP4 video to other Premiere friendly movie format like MPEG-2, FLV and more (Note: it applies to all kinds of Adobe Premiere including Adobe Premiere Pro, Adobe Premiere Pro CS3/ CS4/ CS5/ CS6).

Solution for Edit iPhone 7 (4k) Video in Adobe Premiere Pro perfectly

To fulfill your task, you can just get Pavtube HD Video Converter for Mac, a powerful video converter, editor. It can easily transcode your iPhone 7 .mp4 videos to Adobe Premiere Pro best editable .mpeg-2 format for ncie editing. Besides, it also can convert other iPhones video like iPhone 6s/6s Plus/5s/5s Plus etc video to Adobe Premiere Pro formats powerfully. In addition to transcoding iPhone 7 .mp4 video to Premiere supported videos with optimized settings while keeping the video quality, the all-in-one and easy-to-use toolkit can convert all other popular SD/HD video formats like AVI, MXF, WMV, MKV, FLV, MTS, VOB, H.265 etc. to Adobe Premiere Pro, iMovie, FCP natively supported video formats on Mac OS X (macOS Sierra, El Capitan Yosemite, Mavericks, Lion included) with fast encoding speed.

For Windows users, please get help from Pavtube HD Video Converter Download the program and learn how to convert iPhone 7 files to Adobe Premiere Pro format.

(Mac version)

 (Windows version)

Steps on converting iPhone 7 MP4 footage to supported MPEG-2 MPG for Adobe Premiere Pro CC

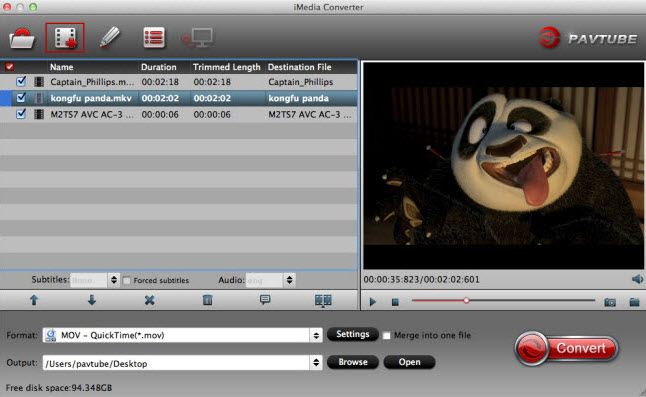
Step 1. Click “Add File” button to import the unsupported iPhone 7 MP4 video file. Or you can also drag your MP4 video directly to the main interface of this MP4 to Premiere Converter.

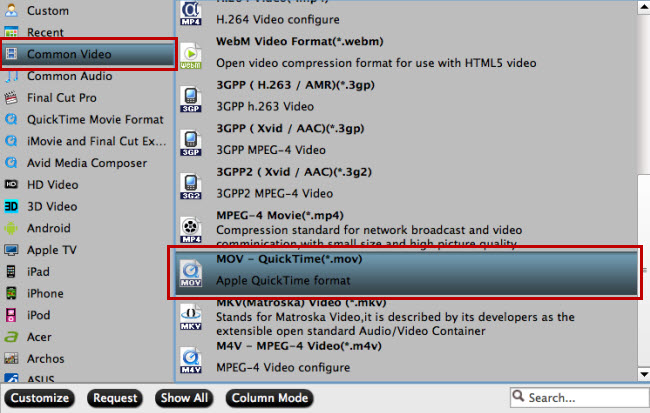
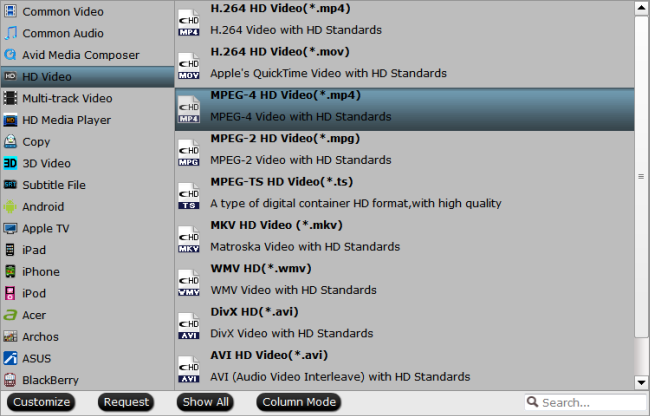
Step 2. When you come to the output list, we suggest you to drop down the list and find the ‘Adobe Premiere Pro’ column and choose the ‘MPEG-2 MPG’ as the nice one. Or other suitable output format is also available.

Tips: Advanced functions

A. Click the “Edit” button to open the Video Edit window to achieve editing MP4 like trim, crop, image, watermark, effect, subtitles and rotate and etc in the corresponding editing pane.

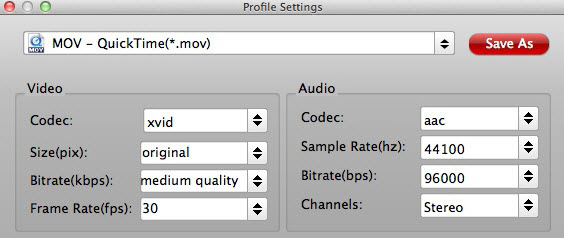
B. Click the “Setting…” button to open the Advanced Settings window to adjust the output video codec, resolution, bitrates, frame rate, aspect ratio, audio codec, channel, volume and etc in the advanced tab.

As soon as we have finished all the preparation work there, just get back to the main interface to click the ‘Convert’ icon to get the work started. After transferring the files to Adobe Premiere CC as usual, we can edit the recordings in Adobe which shot from iPhone 7 and iPhone 6s/6s Plus/5s/5s Plus. Have a try!

Read More:

Play iPhone 4K video on TV | Play 4K XAVC S on Plex

Edit 4K video on iMovie | 4K Video to Cyberlink PowerDirector

Import Media Files to Adobe Premiere Pro

Import MXF OP-Atom Files to Premiere Pro 

Import Canon XC10 XF-AVC MXF 4K/1080p to Premiere Pro 

Import/Edit Canon XF100 MXF to Adobe Premiere Pro

Import Samsung NX1 H.265 recordings to Adobe Premiere Pro 

Import/Edit Blackmagic 4K Ultra HD Prores with Adobe Premiere Pro CC

Upload 4K Video on YouTube/Facebook/Vimeo

Export 4K from Premiere with Best Settings for YouTube/Vimeo

Compress and Convert 4K video to iPhone 7/iPhone 7 Plus

Does Apple QuickTime Player support h.265 on Mac OS Sierra/El Capitan?

H.265 or High Efficiency Video Coding (HEVC) is the latest generation video compression standard which compresses a video file into smaller package, making it easier to store or transmit. Today is the turn of HEVC. However, many devices and applications like QuickTime player are still need time to support the new codec. Do you have some HEVC/H.265 files saved on your computer, and wonder how to make H.265 files playable in QuickTime player on Mac OS Sierra/El Capitan? You’ve come to the right place.

Since QT player can work with H.264 MP4, MOV, M4V videos well, to get H.265 files playable in QuickTime Player, a quick fix is to convert H.265 to QT Player readable format for playback easily.

One of the best Yosemite/Mavericks H.265 Converter from the market so far is Pavtube iMedia Converter for Mac, which is recentlyupgraded to support H.265 encoding and decoding and it can be taken as a completely professional H.265/HEVC encoder, decoder, player and editor.

With it, you can convert H.265 to QuickTime player friendly H.264 MP4, MOV, M4V video on Mac OS Sierra/El Capitan with quality loss effortlessly. And it is available to customize the output resolutions to any size the users want and edit video file with trim, crop, add watermark, insert subtitles, split, merge and other options before conversion. What’s more, it also supports convert non-H.265 video files to H.265 for storage and playback. Download the program and move on to see how to convert H.265 videos for QuickTime player on Mac OS Sierra/El Capitan .

Download H.265 to QuickTime player converter:

Tutorial: Converting H.265/HEVC to QuickTime player friendly format

Step 1. Add H.265 source

Install and run this best H.265 Video Converter. Click add button to import the H.265 files to the program.

Windows Video to Mac Mini Converter

Step 2. Choose QuickTime Player friendly format

Click the Format menu, select QuickTime Player friendly format as your output video format. There, you can take H.264 MP4, M4V, MOV as your output video format.

Choose Quicktime MOV Format

Tip: In case the default settings do not fit your requirement, you can click “Settings” button and enter “Profile Settings” panel to adjust video size, bit rate, frame rate, sample rate and audio channels.

Adjust QT MOV profile settings

Step 3. Start conversion

Finally click the Convert button to begin encoding H.265 to QuickTime player format.

After the short conversion, go to the output folder and drop the converted files into QuickTime player. Once all this is done, add your converted videos to QuickTime player.

Additional Tip:

Want to find another solution to play H.265(HEVC) videos? Just get the best QuickTime Alternative for Yosemite/Mavericks.

Here is a list of the top 2 options:

1. DivX Player

DivX player is another robust HEVC video file player. It is an award winning software that offers HEVC playback. It offers high-quality playback of movies, TV shows. It supports almost all the popular formats like AVI, DIVX, MKV, MP4 and more. By using its DivX Media Server one can stream music, video and photos to any DLNA-compatible device at home like PS3, XBOX, or Samsung Galaxy line of product. With the Stream To feature in player user can also control which device they can stream their videos to.

2. VLC Media Player

Another player that can play HEVC file is the VLC Media Player, which is a free and open source player and framework. It supports a wide range of multimedia files. It can also play DVDs and various streaming protocols.

Now you can experience the H.265/HEVC videos on your QuickTime Player on Mac OS Sierra/El Capitan  freely!

Continue Reading:

Encode Blu-ray to H.265 MP4 | Play H.265/HEVC on Mac

Play H.265/HEVC to PS4 | Play H.265 on LG TV

Edit H.265/HEVC with FCP X | Edit H.265/HEVC in Premiere Pro

HEVC H.265 Encoder for NVIDIA GPU | Encode H.265 with FFMPEG

Encode HEVC/H.265 MP4 to AVC/H.264 MP4 on Mac

Encode/Decode H.265 video for iPhone/iPad/Apple TV on Mac

Best 10 Prores Converter to Decode/Encode Prores on Windows and Mac

What is Prores

ProRes is a lossy video compression format developed by Apple Inc. for use in post-production that supports up to 5K. It is the successor of the Apple Intermediate Codec and was introduced in 2007 with Final Cut Studio 2.

Prores Converter

Why need to convert Prores to other formats

When finished editing in FCP 7 or FCP X in your timeline, you choose to export as Prores 422 but you may find the file size of the Prores is too large or you might want to convert Prores to another different file format such as MPEG-2 for broadcasting or more friendly playback formats like H.264, MPEG-4.

Why need to encode other formats to Prores

As one of the most popular video formats in professional video production and post-production, the Prores codec is developed by Apple for high-quality and high performance editing in Final Cut Pro X. Although the Prores files are larger, but they render fasters and they have more room, so you can create great looking effects without losing any quality.

To help you to fix Prores encoding and decoding issues, the following article has listed top 5 prores converter for Windows and top 5 prores converter for Mac program for you as a reference.

Top 5 Prores Converter for Windows

Top 5 Prores Converter for Mac

Top 5 Prores Converter for Windows

Pavtube Video Converter Ultimate  Pavtube Video Converter Pavtube HD Video Converter Any Video Converter Ultimate Acrok Video Converter Ultimate
Price $65 $35 $35 $49.95 $59
Pros Decode/ encode Prores with the highest quality Convert all popular SD and HD file formats Specially designed for decoding and encoding HD videos Convert video from and to any file types Fine-tuning video properties such as bitrate, frame rate, resolution and aspect ratio
Cons Lacks the ability to download online video Popular hot devices are missing from its support list Popular hot devices are missing from its support list Convert videos at very low speed buggy and crashes often
Support Prores Formats
Prores 4444
Prores 422 (HQ)
Prores 422
Prores 422 (LT)
Prores 422 (Proxy)
Encode Prores from
AVI
WMV
MP4
MKV
MOV
FLV
H.264
H.265
Blu-ray - - - -
DVD - - - -
Decode Prores to
AVI
WMV
MKV
FLV
VOB
WebM
Device Preset Profile Formats
Convert Prores to Audio Formats
Edit output Video
Trim
Merge & Split
Crop
NVIDIA CUDA/AMD APP Acceleration

Top 5 Prores Converter for Mac

Pavtube iMedia Converter for Mac Pavtube Video Converter for Mac Pavtube HD Video Converter for Mac Any Video Converter Ultimate for Mac Acrok Video Converter for Mac
Price $65 $35 $35 $49.95 $59
Pros Decode/ encode Prores with the highest quality Convert all popular SD and HD file formats Specially designed for decoding and encoding HD videos Convert video from and to any file types Fine-tuning video properties such as bitrate, frame rate, resolution and aspect ratio
Cons Lacks the ability to download online video Popular hot devices are missing from its support list Popular hot devices are missing from its support list Convert videos at very low speed buggy and crashes often
Support Prores Formats
Prores 4444
Prores 422 (HQ)
Prores 422
Prores 422 (LT)
Prores 422 (Proxy)
Encode Prores from
AVI
WMV
MP4
MKV
MOV
FLV
H.264
H.265
AVCHD
MXF
XAVC/XAVC S -
Blu-ray - - - -
DVD - - - -
Decode Prores to
MP4
MOV
M4V
Device Preset Profile Formats
Convert Prores to Audio Formats
Edit output Video
Trim
Merge & Split
Crop

Summary:

The best Prores Converter not only decode Prores to all any other file formats, but also helps to encode common file formats to Prores codec for high performance and high quality video editing in Final Cut Pro 7/X. In addition, You can do extra customization work such as trimming, merging, splitting, cropping without using a third-party video editing tools.

Join Pavtube Black Friday & Cyber Monday Crazy Promotion to enjoy 50% off discounts for Pavtube Video Converter Ultimate for Windows/Mac and only $9.9 for Pavtube HD Video Converter for Windows/Mac and Pavtube Video Converter for Windows/Mac.

Source: Best 10 prores converter for Windows and MAC review.

Related articles:

Best MXF Converters For Windows | Best HD Video Converters for Mac

Best Instagram Video Converter |Best MP4 Video Converter

Best VR Video Converter for MAC | Best Free Mac Video Converter

Best TS Video Converter for MAC | Best 5 Blu-ray Ripper

Top 6 Free iPhone Video/Audio Converter | Best 4K Blu-ray Ripper

 Best Vimeo Video Converter | Best Alternative to DVDShrink

DVDSmith Movie Backup Alternatives and Similar Softwares

DVDSmith Movie Backup is a totally free DVD copier and DVD backup software which can decrypt and remove all kinds of DVD protections, copy DVD to computer hard drive as DVD folder. You can flexibly copy entire DVD disc or copy main movie only. But from some forums, we found many people have issues using DVDSmith Movie Backup. So any program to replace DVDSmith Movie Backup? More excellent, more professional? Yes, just follow the top 2 alternatives to DVDSmith Movie Backup.

Best alternative to DVDSmith Movie Backup is Pavtube ByteCopy Software. We have to say it is the best DVD copier/ripper in the world. What's more, it is also an excellent Blu-ray copier, ripper.

Top 1. DVDSmith Movie Backup Alternative

Powerful Features of Pavtube ByteCopy

Support to decrypt all the latest copy protection Pavtube ByteCopy has the ability to bypass copy and region protection on a commercial DVD dis. In addition, as the Blu-ray disc encryption frequently changes and becomes harder to crack, Pavtube ByteCopy will continuously upgrade to support to circumvent all the latest copy protection on Blu-ray/DVD including AACS, BD+, CSS, region code, RCE, Sony ArccOS, UOPs, Disney x-project DRM, etc.
Two Copy Ways ByteCopy can 1:1 backup DVD without quality loss. With the “Full Disc Copy” function in the top menu bar, you can preserve the DVD and Blu-ray’s original file structure, backup Blu-ray and DVD disc to Mac with one click. Using “Directly Copy” feature, you can backup Blu-ray main movie or “Directly Copy 3D Blu-ray Disc” content in original M2TS/VOB format with original video quality.
Lossless/uncompressed MKV option and multiple soft audio tracks & subtitles. ByteCopy offers a lossless MKV option in output list, which means you’ll get a real uncompressed MKV file keeping DTS 5.1/7.1 surround audio without any quality loss on big screen. It also offers multi-track MP4/MOV/AVI presets with multiple audio streams and removable subtitles, so you can free switch, turn on/off during playback.
Various output presets. Pavtube ByteCopy supports converting DVD to virtually any popular video and audio format so that you can freely watch movies on Apple iOS devices, Android OS devices, HDTV, 3D TVs, PSP, PS4, PS3, Plex, WDTV Live, Roku 4 and more devices. In recent update, ByteCopy can support ripping Blu-ray/DVD movie to H.265/HEVC MP4 with better video quality compared to H.264 MP4 in same profile presets. It even can create 3D SBS video from 2D/3D Blu-ray and DVD on Mac for your VR Headsets such as ZEISS VR One, Oculus Rift CV1, ANTVR Kit, Samsung Gear VR, etc.
Stable in Latest Mac Operating System ByteCopy supports the latest Compatible with Windows 10, Windows 8.1, Windows 8, Windows 7, Windows XP. Mac version supports Mac OS X including MacOS 10.12 macOS Sierra, Mac OS X 10.11.4 El Capitan, Mac OS X 10.10 Yosemite, 10.9 Mavericks, 10.8 Mountain Lion, 10.7 Lion, 10.6 Snow Leopard, 10.5 Leopard.


How to Use Pavtube ByteCopy to Copy DVD/Rip DVD?

Download Windows version or Mac version


Step 1. Load DVD movie

Click “File” in top left corner and follow “Load from disc” to load the DVD movie to DVD Ripper on Windows or Mac.

Step 2. Two ways to copy DVD movie

A. DVD full disc copy

Full disc copy allows you to keep the whole file structure in your DVD disc complete without any quality loss. Click the “Copy the entire disc” button to start DVD full disc copy.

B. Directly copy

If you hate the extras in the DVD, you can try copying DVD main movie only which will leave out any extras for you. Click the format bar to follow “Copy” > “Directly Copy.”

Step 3. Rip DVD to multi-track MKV/MP4/MOV/AVI

Pavtube ByteCopy also allows you to preserve multi-track information when you choose DVD to multi-track MKV/MP4/AVI/MOV. Click the format bar to pick the proper multi-track output format under “Multi-track Video” option.

Step 4: Start backup and copy DVD

If you choose the second or third way to copy DVD movie, you need to hit the “Convert” button in bottom right corner to start DVD main movie copy or DVD to multi-track MKV, MP4, MOV and AVI conversion. When the process is completed, open output folder and find the ripped DVD file. 

Finally, you can enjoy your DVD movies on computer as you like without hassle. 

Top 2. DVDSmith Movie Backup Alternative

Free DVDAid offers every user the opportunity to rip, encode and edit DVD to almost any video and audio format freely. Without extra payment, you could own a freeware to assist with DVD to video/audio transition which enables you to watch DVDs on other multimedia players without limitation. Plus, with the built-in video editor, Free DVDAid is considered to be a easily handled video editing tool with the ability of trimming, cropping, splitting, merging, adding subtitle file, etc.

  • A 100% Free and Easy way to rip your DVD Movies for Personal Use
  • Support DVD disc, DVD VIDEO_TS folder, and DVD IFO/ISO
  • Rip DVD to AVI, MKV, MOV, M4A, AAC… around 70 video and audio formats
  • Fast conversion speed with the NVIDIA CUDA technology and AMD ® Accelerated Parallel Processing (APP)
  • Customize DVD content with built-in video editor

You can go to learn how to use Free DVDAid software.

Source: techmovieshare.blogspot.com

Related Articles:

Format Factory Alternative | Camtasia Studio Alternative | Handbrake Alternative | MakeMKV Alternative | Super Converter Alternative

MPEG StreamClip Alternative | Superior iMovie Alternative | QuickTime Alternative | iDVD Alternative | Wondershare Alternative |RipIt Alternative

Best MediaCoder Nvidia H.265 Encoder Alternatives | Adobe Flash PlayerAlternative | Freemake Video Converter for mac Alternative | Flip4Mac Alternative

DVD Rippers Review | Pavtube ByteCopy Review | Video Converters for PC Review | H.265/HEVC video decoder Review | 4K Blu-ray Ripper Review

Best VR Movies Review | DJI Phantom 4 Pro+ Review | DJI Mavic Pro Review | Instagram Video Converter Review | Microsoft Surface Review

4K Video Editor Review | Pavtube iMedia Converter Review | Blu-ray to QuickTime Review | Customer Review for Pavtube Media Magician


Convert YouTube video to SWF on Windows

As we know, YouTube is a nice place to discover, watch, upload and share videos and many video fans love to download YouTube video for entertainment. And SWF is an Adobe Flash file format which is widely used for streaming flash videos online due to its small file size. For certain usage, you will need to download YouTube and convert YouTube to SWF. Now it is completely possible with the help of YouTube to SWF Converter. This article guides how to download and convert YouTube video to SWF on Windows or on Windows/Mac with the powerful YouTube to SWF Converter.

This best YouTube to SWF converter is called Pavtube Video Converter Ultimate (Mac). It can convert any YouTube videos to SWF format on Windows(10, 8.1, 8, 7, XP, etc), or on Mac OS X 10.11 El Capitan, Mac OS X 10.10 Yosemite, 10.9 Mavericks, 10.8 Mountain Lion, 10.7 Lion, 10.6 Snow Leopard, 10.5 Leopard. Besides, it also supports convering various video to any format you want, for example, MP4 to SWFDVD to MP4H.265 to AVI, ISO to MP4, etc.

Free download the best YouTube video converter for Windows: 


Other Download:


- Pavtube old official address: http://www.pavtube.cn/blu-ray-video-converter-ultimate/ 
- Cnet Download: http://download.cnet.com/Pavtube-Video-Converter-Ultimate/3000-2194_4-75938564.html 
- Soft32 Download: http://pavtube-video-converter-ultimate.soft32.com/ 
- Top4download: http://www.top4download.com/pavtube-video-converter-ultimate/qxxwevxs.html 
- Softpedia Download:http://www.softpedia.com/get/Multimedia/Video/Encoders-Converter-DIVX-Related/Pavtube-Video-Converter-Ultimate.shtml 
- OKD Download: http://owlkingdownload.com/index.php?a=prog&os=Mac&cat=Audio-Video&subcat=Video&det=475 
- Windows7download:http://www.windows7download.com/win7-pavtube-video-converter-ultimate/talndtbf.html 
- Softonic Download:https://pavtube-video-converter-ultimate.en.softonic.com/ 
- 2software.net Download:http://2software.net/download-pavtube-video-converter-ultimate-free-download-and-software-reviews-4051 
- Gigapurbalingga Download: http://gigapurbalingga.com/pavtube-video-converter-ultimate-full/ 
- FullprogramDownload: https://www.fullprogramlarindir.com/pavtube-video-converter-ultimate-full-tam-indir.html 
- Daffasoft Download: http://daffasoft.com/1716/pavtube-video-converter-ultimate-4-8-4-full-crack 
- Eradownload: http://eradownload.com/pavtube-video-converter-ultimate-4-8-6-6-crack-free-download/ 
- Eurodownload: http://www.eurodownload.com/download-software/223704/Pavtube-Video-Converter-Ultimate.html

Step 1. Run the best YouTube Video to SWF Converter, drag and drop source video to the program.


Step 2. At the bottom part of the converter, there is a row of output formats divided into several sections. You can find SWF format under the “Flash Video”.


Tips:

A. For some advances users, you can go to adjust video and audio parameters like bitrate, resolution, channels, etc. Click “Settings” button you can go to check and change them as you like.

B. The YouTube Video Converter additionally offers editing functions for you to enhance your video files. For example, you can trim or crop your videos to get the very parts of your video, you can also add watermarks in text or image, subtitles to your video, and so on.

Step 3. Press on “Start Conversion” to start encoding YouTube videos to SWF video. When conversion completes, press on “Open” to locate converted videos and add them for your usages freely.
Read More:

Blu-ray movies on QuickTime on Mac OS X El Capitan

What is the first media player on Mac OS X El Capitan? Quicktime will be the one. Not because it is bundled with Mac OS X, just in that it's powerful media technology that works on Mac OS X El Capitan with just about every popular video or audio format you come across. Its playable audio and video formats just like the same sheet:


Although QuickTime supports many video formats, as we all seen, Blu-ray is not in the list. So if you have many Blu-ray movies, no matter from your paid Blu-ray discs or downloaded from internet, how do you watch Blu-ray movies on QuickTime Mac OS X El Capitan?

Pavtube BDMagic for Mac is exactly designed for this problem. This Blu-ray to QuickTime converter enables you to rip and backup Blu-ray to QuickTime playable formats at ultra fast time with high video quality. What’s more, it is updated to support the Mac OS X El Capitan and Yosemite 10.10. So you can rip Blu-ray on your Mac OS X El Capitanand Mac Yosemite 10.10/10.9. It also can play Blu-ray movies of region A, region B and region C.


Free download and install:


Other Download:
- Pavtube old official address: http://www.pavtube.cn/blu-ray-ripper-mac/
- Cnet Download: http://download.cnet.com/Pavtube-BDMagic/3000-7970_4-76177782.html

How to rip Blu-ray to QuickTime playable format?

Step 1: Load Blu-ray movies

Click the "Folder" icon on the top menu bar to load your Blu-ray disc to the program


Step 2: Choose QuickTime MOV format

Click "Format" bar, from its drop-down selection, define "MOV-QuickTime (*.mov)" as the output profile format.


Step 3: Start to rip Blu-ray to QuickTime

Start to rip Blu-ray to QuickTime format process on OS X El Capitan by hitting the right-bottom conversion button. When the conversion is done, locate the ripped Blu-ray in the output folder.

Now, you can freely enjoy your Blu-ray movies on QuickTime on Mac OS X El Capitan.
In addition, this Blu-ray Ripper actually can convert Blu-ray, ISO to H.265, M3U8, MP4, etc, for iPhoneiPad, Apple TV directly. Besides, it also has powerful function to extract FLAC audio

Source: http://2d-3d-movie-tips.blogspot.com/2015/07/watch-blu-ray-on-quicktime.html

3D MKV movies to Rift CV1 on macOS Sierra/El Capitan

If you are the lucky ones who have tried these Rift CV1 on macOS Sierra/El Capitan, both in versions for the Rift CV1 to the recent macOS Sierra/El Capitan as well as 3D MKV movies to Rift CV1, sure you’ve fallen in love with the virtual reality with its endless possibilities. They open when live experiences, enjoy the games from completely new perspectives and, of course, when it comes to watching 3D MKV movies in the famous film that comes standard with the glasses. On the other hand, just like other devices, Rift CV1 users are also likely to experience various technical problems, especially when playing 3D MKV videos 3D effects. One of the common problems you might often experience is "Audio missed" or "Unsupported errors". If you don't have any idea of how to fix these problems, just read on for details. 

A very common problem macOS Sierra/El Capitan users ave is playing 3D MKV movies. When you Mac tried to open 3D MKV files on Mac to Rift CV1, you'll commonly receive an error message along the lines of this is not a movie file. Actually, Rift CV1 doesn't support the MKV or HD MKV files natively. This gets really annoying if you come across a 3D MKV file and want to watch it on your Mac. Fortunately, there are a lot of options to help you play an 3D MKV file in the macOS Sierra/El Capitan. 

In fact, 3D MKV files in 3D SBS(Side-by-Side) work on Rift CV1, but the audio has to be encoded in AAC or MP3 for stereo. AC3 and DTS were removed because of high licensing costs. You can either wait till a developer brings a Rift CV1 VR player which supports also custom codecs or you can convert your video files to ACC audio or root your phone and add codecs for AC3/DTS. However, the easy and effective solution is to re-encode your 3D MKV files to Rift CV1 more compatible format to get them play nicely.  Pavtube ByteCopy for Mac  is the bee's knees, which can help you easily solve the 3D MKV 
and Rift CV1 no sound problem. 

Overall, the program is a professional 3D MKV Video Converter, which comparatively has better output quality, in particular HD videos and intuitive interface. With it, you can fast convert MKV to Rift CV1 supported file type like MP4, MKV in .mp3, .aac audio. Best of all, this software allows you to convert 3D MKV to 3D videos such as MKV Top-bottom 3D Video, MP4 Top-bottom 3D Video, MP4 Side-by-Side 3D video (See The Differences Between SBS 3D, Anaglyph 3D and Top/Bottom 3D ) , which can be played on Rift CV1 perfectly. If you are Windows users, please turn to  
Pavtube ByteCopy  for Windows. Now, we will give a detailed guide on the whole process from converting 3D MKV to Rift CV1 supported video. 

The Best 3D MKV Movies converter Tool: 


Other Download:
- Pavtube old official address: http://www.pavtube.cn/bytecopy/
- Cnet Download: http://download.cnet.com/Pavtube-ByteCopy/3000-7970_4-76158512.html

How to convert MKV to Rift CV1 supported format without quality loss 

Step 1. Load movies files to the software 


You can either click "Add" button to import MKV files you want to upload to YoubTube. Also you can directly drag and drop the files into this program. 

ISO to MKV Ripper

Step 2. Select the 3D MKV as output format 

Click "Profile" and find "3D Video". there are a lot of format options for you. Here you can recommended to select MP4-3D or MKV-3D as the output format. 

SBS 3D MKV video

Step 3. Specify video/audio parameters 

Click Settings button to adjust video/audio parameters like video resolution, bitrate, audio codec, audio channel. According to my experience, anything over 720p does nothing but turn battery energy into heat, due to the screen resolution. 

3D SBS MKV settings

Step 4. Start encoding 3D MKV to Rift CV1 

Click Convert button to start converting 3D movies MKV to Rift CV1 friendly video. After the conversion, you can get the resulted videos by clicking the Open button.


Tips: Add 
3D MKV movies on Rift CV1 watching

To watch your 3D MKV movies on Rift CV1, however, there is an additional step, and it's not entirely straightforward.

The following will allow for perfect 3D playback of videos set up in a SBS format. SBS format means the left and right video channels are contained within the same file and appears as a near-mirror image when played back using a standard media player. To view your SBS 3D video files on your 
Rift CV1, follow these steps:

1. On your MicroSD card file directory, navigate to Oculus > Movies > Your Movies
2. Create a new folder within "Your Movies" and label it "3D"
3. Import or move your SBS 
3D MKV movies into your newly created "3D" folder

Once you have created your 
3D MKV movies and imported compatible video files, insert your MicroSD card into your phone (if it isn't already), slide the phone in your Rift CV1, and put the virtual reality headset on your head. Then:

1. Navigate to 
Rift CV1 from the main menu
2. Navigate to "My Videos" from the 
Rift CV1 content library menu
3. Select the 3D video you wish to view (if you followed the above steps it should have a "3D" label in the upper righthand corner)
4. Choose the cinema mode to begin playback

Related Article and Tips: 

Remove Disney X-project DRM DVD on Windows 10/Yosemite
How to Get all DVDs into Synology NAS drive for Streaming
How to Backup Disney Copy-Protected DVD Discs for watching
Watch 3D Movies on Mobile Device using a VR Theater application
Watch YouTube 3D Videos on Sony BRAVIA HD TV
Ripping TV series DVDs to PC
Copy 2016 hot Blu-rays to NAS for HD 4K TV or Normal def TV streaming
Enjoy free and smooth Blu-ray playback on Galaxy S7/S7 Edge
Can I Store iTunes Movies to An External Drive to play in LCD TV?
Top 3 3D Video Converters for Mac El Capitan 10.11.1/10.11.2
2016 Best 3 DVD Ripping Software
Backup and Put Blu-rays to Synology DS416slim NAS on Mac
How to Get AVCHD MTS Workflow with DaVinci Resolve (Lite)?
Best Software for ripping Blu-ray Audio to FLAC on Mac OS X
2D 3D Movie Tips: The best way to convert all 2D videos to 3D SBS MP4.
Copy Blu-ray to DESTEK Vone 3D VR Headset 


Source:http://2d-3d-movie-tips.blogspot.com/2016/08/3d-mkv-movies-to-rift-cv1-macos-sierra.html