With the success of the Surface Pro 3, many are now on the lookout for the next generation tablet/laptop hybrid, the Surface Pro 4. As of now, Microsoft has not confirmed that they are working on another Surface Pro, but rumors regarding its specs and features have started to circulate online early this year. (Read News: Microsoft set to Announce Surface Mini this Month) 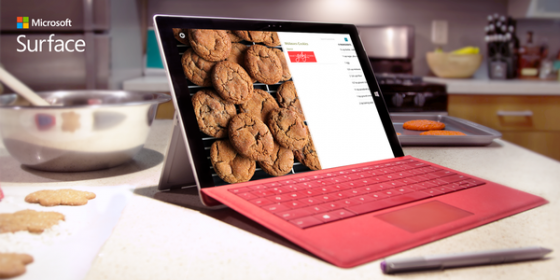 According to Crossmap.com, the upcoming version of the Surface Pro will have a bigger display screen than the previous versions, but will also be lighter than the Surface Pro 2 and 3. Master Herald also reported that the Microsoft Surface Pro 4 will be released in various sizes. One version will have a 13-14 inch screen for those who want a bigger tablet, and the other will be the 8-inch screen variant, which will be called Surface Pro Mini, that is suitable for users who prefer a more handy and portable gadget. Additionally, Latinos Post revealed that Surface Pro 4 will have a greater CPU than its predecessors and will be running on the upcoming Windows 10. Also, the gadget is believed to have an increased RAM compared to the older versions of Surface Pro.Surface Pro 4 video playback tips Everyone can’t wait to play games or videos on it when travelling or on the move. Then how to play videos on Surface Pro 4?1. How to play videos from your video library Step 1: From the Start screen, tap or click Video. If you’re prompted, sign in with your Microsoft account. Step 2: Scroll left and then tap or click personal videos2. Add videos to your video library Videos in your Videos library appear in the Video app. For help copying videos to your Videos folder, see Move files to your Surface.3. Play videos over your home network If your videos are stored on another computer that’s part of your home network, or homegroup, you can join the homegroup and watch your videos without copying them to your Surface. To learn how to watch files on your home network, see Share files on a home network.Surface Pro 4 video format Use File Explorer to find out what format a file is in: Step 1: Tap and hold the file. (Right-click it if you’re using a mouse). Step 2: Tap or click Properties, and look next to Type of file to see what type it is and next to Opens with to see which application will open it. If you need help using File Explorer, see How to work with files and folders. Audio files that Surface can play
 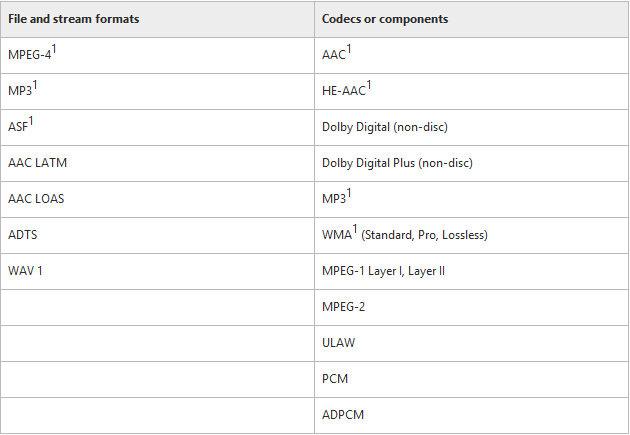 Video files that Surface can play
  Note: For Surface Pro 4, adding Windows Media Center or installing other apps and programs will allow you to play, view, and edit files in other formats. See Get started with Windows Media Center.Surface Pro 4 video converter Of course, HD or 4K ultra video files are highly suggested in order to have an ultimate visual experience. In order to play the high definition videos, usually, you have to figure out the supported players among thousands of software and even install different video players over and over. Frustratingly, you will turn to experts: what kind of video converter for surface pro 4 is really helpful?
 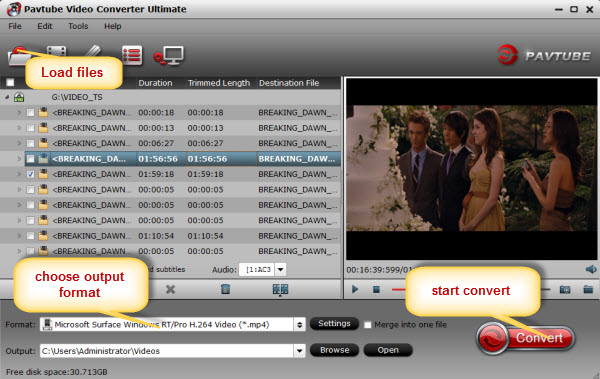 With extraordinary features, Pavtube Video Converter Ultimate is welcomed by users who want to convert Blu-ray, DVD and videos. It is capable of converting nearly all popular audio and video format including WMV, MP3, Matroska, MP4, 3GP, and more, and unprotected Blu-ray or DVD moviefiles to any format. At the same time, it provides presets for various mobile phones like Surface Pro 3, Surface Pro 4, Samsung, iPhone, iPad etc. If you own this all-in-one converter for surface pro 4, you will never worry about spending much time on finding out the suitable video player and install it on Surface Pro 4 for different video formats. Mac version is here. More Upload Zenmuse X5 and X5R 4K videos to Youtube/Vimeo/Facebook/Google Convert MXF to EDIUS Pro 7/8 for Editing - Best MXF Converter for Mac Play Unsupported Video Format on New iPad Pro Convert Video to M3U8 with FFmpeg Alternatives for Windows How to Import Sony HDR-CX405 XAVC S/AVCHD/MP4 to FCP X Import MKV to Samsung Smart TV for Playing Specifics to Convert BPAV File to Editable MOV for Importing to FCP Importing GoPro HERO4 Black 4K MP4 videos to Premiere Pro Src Watch 3D Blu-ray on Galaxy S6/S6 Edge via Gear VR
The new Surface 3 is a great surprise. Unlike most high profile devices these days, Microsoft got the smaller, lighter and cheaper version of its excellent Surface Pro 3 out of the door without a single leak. So, given the two machines look virtually identical, what is the comparison between them? Which one is better? Which should you buy? It’s a tough ask. Let’s explore together what it the exactly major differences between Surface 3 and Surface Pro 3. (Read 2015 Top 10 Smartphones and Tablets review) 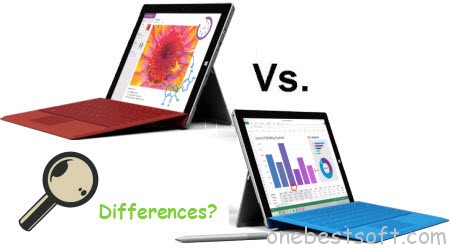 Specs First, let’s go through the specs from the chart below.
 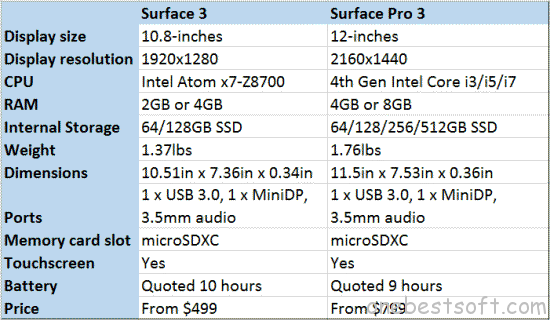 Now that the specs are out of the way, let’s compare the two and find one where they shine.Power Many users will be considering a Surface device for resource-intensive applications, and that requires plenty of processing power. Here, Surface Pro 3 wins, hands down. Surface Pro 3 is equipped with high-end Core i processors, which are designed to offer a good balance between performance and battery life, while Surface 3 is equipped with an Atom processor that prioritizes battery life over outright speed. Not to mention that Surface Pro 3 can be had with a very powerful Core i7 processor, which furthers the performance gap. Also, Surface Pro 3 can be had with 8 GB of RAM, twice as much than Surface 3 offers in its flagship model, which will make multitasking easier. Even the base Surface Pro 3 model comes with 4 GB of RAM, while the base Surface 3 only offers half as much. That said, Surface 3 will be able to handle typical Windows software, like Google Chrome and Office. It just won’t be able to handle all your virtual machine instances or development software as well as (or even remotely close to) Surface Pro 3.Productivity If you ignore the x86 processor found in Surface 3, the smaller Surface looks more like a typical tablet than a mobile device that might replace an ultrabook or smaller laptop. It will run all the Windows programs that users want, naturally, however it is limited in the productivity department by its smaller 10.8-inch display. In practice, you’ll be able to browse the web, write an Office document and handle all your email, but you may want to connect it to a bigger screen to increase productivity. However, Microsoft is trying to make Surface 3 appeal to more consumers by bundling a one-year Office 365 subscription with each purchase. That’s not the case with Surface Pro 3; you’ll need to buy one separately. Having used Office 365 for a few good months now, it’s hard not to see the value in it (hey, on top of Office, there’s 1TB OneDrive storage thrown in for free — and if you know where to look, you can unlock unlimited storage), especially for folks with tight budgets (like students). Meanwhile, Surface Pro 3 is designed as a “tablet that can replace your laptop”. It’s got a bigger display, akin to what you can find on a popular ultrabook like Apple’s larger MacBook Air, it comes standard with a stylus (Surface Pen, optional on Surface 3), the kickstand can be angled in any number of ways (Surface 3′s kickstand only has three positions), and the optional Type Cover keyboard is larger, and, most likely, more pleasant to type on, and also comes with a larger touchpad area.Connectivity Even though on the surface both Surface 3 and Surface Pro 3 are capable of meeting the needs of a road warrior, only Surface 3 also gives the user the option to connect to a 4G LTE network. This can be a major advantage for those who don’t want to use their smartphone to tether or are unable to do so. Also, no matter which Surface 3 model you choose, you get Wi-Fi 802.11ac as standard. This isn’t the case with the base Surface Pro 3 model, which gets the slower Wi-Fi 802.11n. The speed difference can be substantial, as long as you have a solid Wi-Fi 802.11ac router. Both slates offer a full-size USB 3.0 port, and a mini DisplayPort to connect an external display. It’s worth pointing out that Surface 3′s connectivity can be enhanced using a Surface Pro 3 Docking Station (it goes for $199.99).Mobile Credentials Let’s talk about portability and battery life. Both Surface 3 and Surface Pro 3 promise similar battery life, except that whereas Surface 3′s battery life is quoted for video playback, Microsoft rates Surface Pro 3′s battery life for Wi-Fi browsing. As such, we can’t really compare the two directly, as it’d be an apples to oranges comparison. However, both devices should offer great battery life when used accordingly. When it comes to portability, Surface 3 is the clear winner. It’s both smaller and lighter, which means that it won’t take as much room in a briefcase or backpack. Even with the optional keyboard on, it won’t be much bigger or heavier than Surface Pro 3, sans its Type Cover keyboard. That said Surface Pro 3 packs a bigger punch, which will make it easier to work with heavy software on the go, if you ever need or want to do so. It’s something to keep in mind, as battery life is likely to be similar and the extra bulk isn’t intimidating.The Elephant in the Room It’s the cost. Surface 3 is priced like a high-end tablet. The base model kicks off at $499, and for the money you get the 64 GB version with 2 GB of RAM. Step up to the 128 GB version with 4 GB of RAM, and you’ll have to shell out just $100 more ($599). The 4G LTE option adds $100 to the cost, for either model. For a Type Cover keyboard, Microsoft will ask $129.99 (once it’s available, of course). The stylus is a $49.99 option, which, depending on your needs, you may or may not want to get. Type Cover, however, is a must-have from my point of view. Now let’s look at Surface Pro 3. The base model, which offers 64 GB of internal storage, Core i3 processor and 4 GB of RAM, costs $799. There’s no 4G LTE option, but Surface Pen is included. Type Cover also costs $129.99. You may be able to get Surface Pro 3 for less, seeing as it’s quite old at this stage and there’s plenty of stock. Of course, there’s nothing stopping you from spending upwards of $1,949 on Surface Pro 3 (without a keyboard, I should point out), to get the top-of-the-line model with 512 GB of internal storage, Core i7 processor and 8 GB of RAM. So, if cost (and the added mobility) is a major concern, Surface 3 makes more sense. The $300 price difference, which isn’t small, between the base models can go towards a Type Cover keyboard, extended warranty and other things.Fundamental Differences Going by the specs alone, Microsoft has introduced Surface 3 for people who want Surface Pro 3, but do not need the extra performance offered by the Core i processors nor the larger display. Those can be folks who work more on the go (hence the 4G LTE option), don’t run heavy software, and who, when they’re at the office, connect their Surface to a proper monitor (which Surface 3 can handle, of course). If that’s you, maybe Surface 3 should be your first option. Surface 3 retains all the other benefits provided by Surface Pro 3, like the compatibility with the docking station, Surface Pen support, and more, but offers them in a much more portable package. What’s not to like? Meanwhile, Surface Pro 3 is aimed at folks who are looking for a tablet (let’s say hybrid device) that they’ll be using more at the office than on the go (or, if it’s more on the go, they don’t mind/they need the extra screen estate), which can run heavier software, and that they can store lots of data on. They also have to look past the higher asking price.SUMMARY Basically, Surface Pro 3 is more like a Swiss Army Knife, while Surface 3 looks more like a camping knife, in comparison. Personally, I prefer the Swiss Army Knife, even though the camping knife looks quite good for considerably less money (metaphorically speaking, of course). How about you? Let us know in the comments below. Reference: http://betanews.com/2015/03/31/microsoft-surface-3-vs-surface-pro-3-which-is-best-for-you/Extending Reading: Enjoy iTunes Movies on Surface 3/Surface Pro 3
  No matter which tablet you have bought, it is inevitable for you to play and enjoy videos on Surface 3/Surface Pro 3. Do you often rent or Buy Movies From iTunes? Have you ever thought of watching iTunes movies on your Surface 3/Surface Pro 3? Yes but found the iTunes movies can’t be imported to your non-Apple devices? Don’t worry. If you are just looking for a way to transfer for iTunes DRM protected movies to your new-buying Surface tablets, you can simply use Pavutbe DRM iTunes to Surface Converter- ChewTune to remove the DRM protection and convert the iTunes movies to Surface supported video formats. (Read reviews and steps to realize) By removing DRM protection from the iTunes movies, you will be free from all the DRM restriction and able to keep iTunes rentals as long as you want or get the DRM-free iTune movies to Surface tablets, Andorid devices, Xbox one, Chromecast and more for enjoying with lossless quality kept. iTunes 12 supported!
Surface Pro 3 vs. iPad Pro, Which is Better? Apple’s new iPad Pro is big news, but it isn’t the only big-screen tablet out there that’s designed to help you work. The Microsoft Surface Pro 3 has been targeting business users and creative professionals for over a year now. Both Apple’s and Microsoft’s slates have a keyboard and stylus accessory, both can run Microsoft Office, and both start at $799. But there are quite a few differences as well.  Display and Size The iPad Pro packs the biggest display ever seen on an iPad, with a 12.9-inch screen that boasts 2732 x 2048 pixels of resolution. That’s 5.6 million pixels. The Surface Pro 3 has a smaller 12-inch panel and offers a lower resolution of 2160 x 1440 pixels. Processing Power Apple built a new chip A9X for the iPad Pro which is more powerful than iPad Air 2, while Microsoft Surface Pro 3 starts with an Intel 4th Generation Core i3 CPU. It’s been tested with Core i5 model, which scored 5,665 on Geekbench 3. The MacBook Air, which has a similar chip inside, scored 5,393. The iPad Air 2 scored 2,694. (The Surface Pro 4 could pack a faster Intel Skylake CPU.) Battery Life The Surface Pro 3 lasted 7 hours and 27 minutes on our Laptop Mag Battery Test (Web surfing via Wi-Fi with the brightness at 150 nits). Apple claims that the iPad Pro will last a much longer 10 hours on a charge when surfing the web via Wi-Fi. Ports The iPad Pro features just a single Lightning connector while the Surface Pro 3 has a full-sized USB 3.0 port, a miniDisplayPort for use with external displays, and even a microSD card reader hidden behind the fold-out kickstand. Software One of the biggest differences between the iPad Pro and the Surface Pro 3 are their operating systems. The iPad Pro runs iOS 9, which offers Split View multitasking, allowing you to work on two apps side by side. The separate Slide Over feature lets you open a second app without leaving the one you’re in. Last but not least, iOS 9 includes handy shortcuts and features in its keyboard app, including an easy way to select text by dragging two fingers across the layout. The Surface Pro 3 sports a full copy of Windows 10, so it can run the same programs you get on a traditional laptop or desktop. That means pros can use the exact same version of apps like Adobe Photoshop or AutoCad. Windows 10 also features the voice-enabled Cortana assistant, an enhanced Snap feature that lets you run four apps at once and a new Edge browser that works well with the Surface’s pen for marking up pages. Price
  Outlook It’s too early to say with certainty which of these oversized slates will ultimately reign supreme. We can say, however, that the Surface Pro 3 earned only a 3-star rating when we reviewed it last year. That’s because of its below-average battery life and warm surface temperature. The iPad Air 2 earned 4.5 stars for its superior apps, screen and endurance, but it wasn’t designed as a productivity device like the iPad Pro is. The iPad Pro represents a more direct competitor. Tips & Tricks: How to watch all kinds of videos on Surface Pro 3 and iPad Pro? To play most video formats that are not supported by Surface Pro 3 and iPad Pro like 1080p/720p MKV, MOV, MXF, MTS, AVI, MPG, VOB, what should you do? In my personal experience, Pavtube Video Converter should be your first choice since it can convert any main stream videos to Surface Pro 3 and iPad Pro supported formats. Compare with many other such video conversion tools, you will find this software is much powerful. Conversion could be easily achieved, but to keep the high quality will be much more difficult. Most such tools will supply new videos with much quality loss, but never will this Video Converter. If you are Mac users, you can choose the corresponding Pavtube Video Converter for Mac.

 More Open Blu-ray with Windows Media Player for playback on Windows 8.1/8/7 Rip Blu-ray to H.265 MKV on Mac OS Enjoy 3D Youtube Movies on VR One Via Galaxy S5 XBMC iTunes Converter - How to View iTunes Movie via XBMC? Play DRM-ed iTunes movies & TV shows with VLC Media Player Rip Blu-ray 3D to MKV Full HD 3D with MakeMKV Convert 3D MKV movie files to 3D MP4 files on your 3D devices Backup Blu-ray Movies with only Forced Subtitles Src Surface Pro 3 vs. iPad Pro, Which is Better?
In this tutorial I show you how to make Windows Media Player play Blu-rays on Your PC or Portable Devices. Windows Media Player supports nearly all types of media files. However, many video formats are not included, such as Blu-ray, are proprietary and typically require a royalty payment in the form of a license to its owner. In order for Microsoft to include support for Blu-ray discs, it would have to pay Sony a royalty, which would likely mean passing on that cost to consumers. Instead, Microsoft chooses to let the consumer decide on whether to pay to use Blu-ray technology.“Hey Guys,Is there anything I can download so I can play my Bluray movies using Windows Media Player?WINDOWS MEDIA PLAYER only.. if possible” – MitchellEve“I’ve seen a few threads around here talking about using Windows Media player to play Blu RayDiscs. I am well aware of the whole “Windows doesn’t support Blu Ray” thing and Cyberlink’s software (the stuff that came with my Blu Ray drive) doesn’t always work for me. I have trouble playing certain discs using it.How are you guys getting Media player to play these discs? Is there a plugin I can buy somewhere?Thanks!” – NYTrojanAs we all know, playing Blu-ray disc on Windows must require an external Blu-ray drive to mount the contents on disc.If you want to watch Blu-ray movies on Windows Media Player directly without a Blu-ray player, here are some very easy solutions for you:In order to enable the windows media player to play audio or video formats that are not included in the operating system by default, you would have to obtain the necessary codecs. The media player codec pack website defines a codec as follows:“A codec is a piece of software on either a device or computer capable of encoding and/or decoding video and/or audio data from files, streams and broadcasts. The word Codec is a portmanteau of ‘compressor-decompressor’.” A popular solution for many people is to download and install a codec pack which includes the codecs necessary for playing many mainstream audio and video file formats. The mediaplayercodecpack.com website offers a popular codec pack for Windows media player that includes a number of popular codecs, including support for Blu-ray, which will allow you to watch your Blu-ray movies using Windows media player. You can download the codec pack on CNET’s website or you can go directly to www.mediaplayercodecpack.com.As an alternative, you can use the VideoLAN program, which is also known as the VLC Media Player. The VLC media player is an open source program developed by the VideoLAN organization. The VLC Media Players comes with a large library of audio and video codecs pre-installed. For some people, this option serves as an alternative to using the windows media player which needs to be manually upgraded and tweaked in order to play certain file types.
 The other option, is to simply install Pavtube BDMagic – a commercial, closed-source Blu-ray Ripping software that will play all of your upencrypted or encrypted Blu-ray and DVD discs.With this ripping tool, you can lossless backup the Blu-ray with exactly the same file structure; rip Blu-ray to Windows Media Player highly compatible WMV videos, so that you can playback in Windows Media Player without scratching discs or using the disc drive frequently. What’s more, you can also rip Blu-ray to other popular video formats like MP4, M4V, MKV, AVI, MOV, VOB, MPG, 3GP, FLV, SWF, F4V, etc. bypassing the AACS and BD+ copy protection. Besides, you can extract audio from the Blu-ray movies: MP3, AC3, WMA, M4A, WAV, OGG, AAC, MKA, MP2, AIFF, FLAC, etc. audio formats are supported.Just get it now and follow the guide below to rip Blu-ray for playing in Windows Media Player. (Read more: Online user manua)Steps:1. Load Blu-ray movies.Insert the Blu-ray disc to Blu-ray drive. Download, install and open the Blu-ray to Windows Media Player Ripper. Click “Load File(s)” button on the main interface of program to load your Blu-ray movies. As you can see, you can view the movie on the right viewing window and take snapshots of the movie scenes.
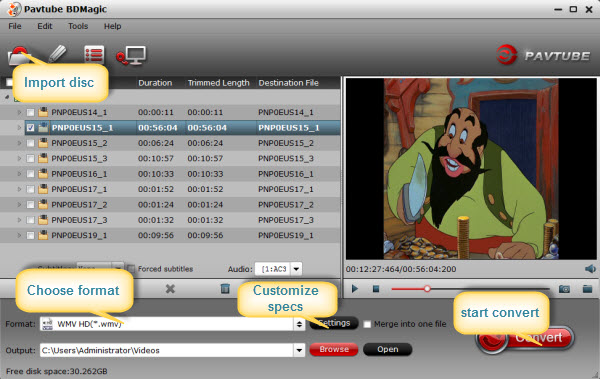 2. Select output format for Windows Media Player.Click “Format” > “Common Video” and choose “WMV” as the output format, or click “Format” > “HD Video” and choose “WMV HD(*.wmv)” as the output format. And set the output saving folder by clicking “Output” and choose a folder to save the ripped files.
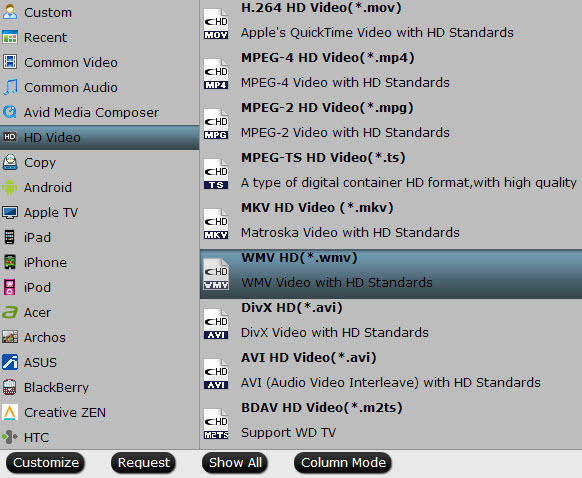 3. Start the Blu-ray to WMV conversionFinally, click the “Convert” button to start ripping Blu-ray movies to WMV for playing in Windows Media Player. The ripper can help you finish the task soon, to save your time and work.When the conversion finishes, you can click “Open” button to get the final output files. Open Windows Media Player and then add items to the Windows Media Player Library for playback.Tips for ripping Blu-ray movies to Windows Media Player:1. Select desired subtitles and audio track: Click the drop-down list of “Subtitle”, then all the subtitle info in the Blu-ray will be displayed for you to select. To select your desired audio track, just click the pull down menu of “Audio”, and then the popup drop-down list will give you the detailed information of all audio tracks, including language, audio codec, and stream ID.2. Join BD/ DVD chapters into one: If you would like to rip the whole movie into one file, select all the Titles and check the box “Merge into one”.3. Maintain 5.1 surround sound: Click “Settings” and select “5.1 channels” in the drop-down list of Audio Channels.
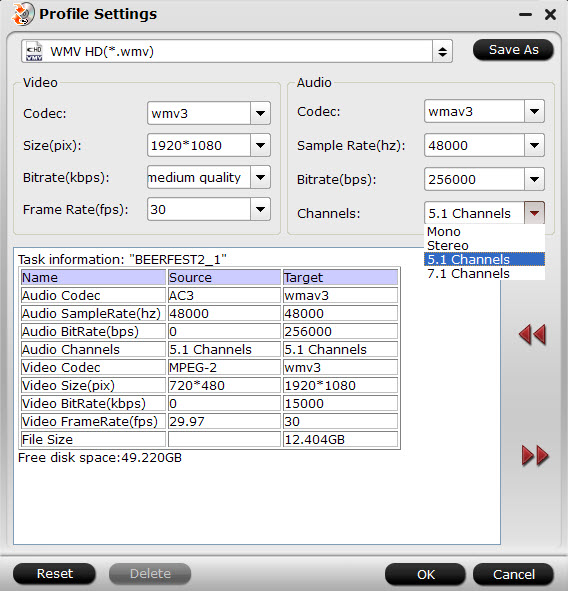 4. Keep audio and video sync: To get perfect A/ V synchronization, you need pay attention to frame rate when ripping BD/ DVD movies to Windows Media Center. You can click on “Settings” and try with different frame rate, like 30fps, 29.97 fps, 25fps, 24fps, etc. “Original” is not recommended.5. Set auto shutdown: Once “Convert” button is clicked, ViewLog pops up. You may check “Shut down computer after conversion” in the ViewLog before conversion starts.For general information about Blu-ray disc technology, take a look at the Blu-ray disc association website.See Also:
Source:http://open-media-community.com/2013/12/24/play-blu-ray-on-windows-media-player/
4. Keep audio and video sync: To get perfect A/ V synchronization, you need pay attention to frame rate when ripping BD/ DVD movies to Windows Media Center. You can click on “Settings” and try with different frame rate, like 30fps, 29.97 fps, 25fps, 24fps, etc. “Original” is not recommended.5. Set auto shutdown: Once “Convert” button is clicked, ViewLog pops up. You may check “Shut down computer after conversion” in the ViewLog before conversion starts.For general information about Blu-ray disc technology, take a look at the Blu-ray disc association website.See Also:
Source:http://open-media-community.com/2013/12/24/play-blu-ray-on-windows-media-player/
We travel a lot an have over 500 DVDs in hand, so I bought a 2TB Seagate Wireless Plus then my family members don't have to fight over the laptop for watching DVD movies. In fact, we can get together with friends and family to enjoy DVD movies via Wireless Plus, the question is: how to convert DVD for uploading to Seagate Wireless Plus? Here what you need is to make use use of a professionally designed DVD to Wireless Plus converter to rip Seagate Wireless Plus video files. And Pavtube DVDAid would be your best choice, which can easily rip DVD movies to Wireless Plus compatible H.264 video, MPEG-4, and Motion-JPEG for video, and AAC, MP3, Audible (formats 2, 3, 4), Apple Lossless, A IFF, and WAV for audio quickly with excellent output video quality.Besides converting DVD files, it can also compress a DVD to smaller file size, saving the space for your console if you need. In addition, the built-in editor allows you to customize your DVD videos to get the very part and effect you want with ease. I have tested it, now after perfectly ripping DVDs, I can get my DVDs uploaded to my 2TB Seagate with ease and freely watching on my mini iPads, 1 kindle and 1 nook. The equivalent Mac version is DVDAid for Mac. Just get the right version and copy DVD to Wireless Plus with ease. (Windows 10 or Mac Yosemite are supported). Other Download:- Pavtube old official address: http://www.pavtube.cn/dvd_ripper/- Cnet Download: http://download.cnet.com/Pavtube-DVDAid/3000-7970_4-76158510.html1. Load DVD moviesFirst, insert your DVDs into DVD Drive, and then drag the DVD files to the program; Or you can get to "File" Menu, click "Load DVD" to draw into DVD movies you want to rip. DVD folder and ISO image files are supported as well.
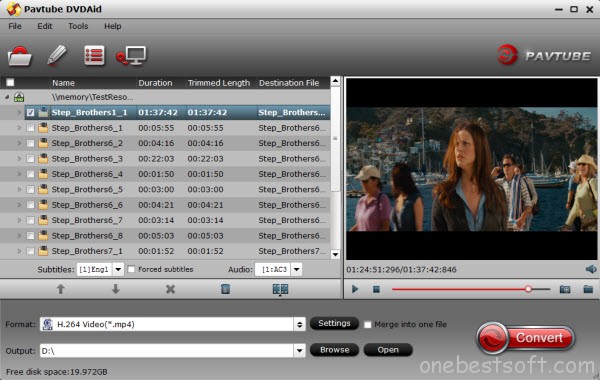 2. Select Seagate Wireless Plus compatible formatsClick the Format bar to select output profile for your Wireless Plus, say "H.264 Video(*.mp4)" from "Common Video".
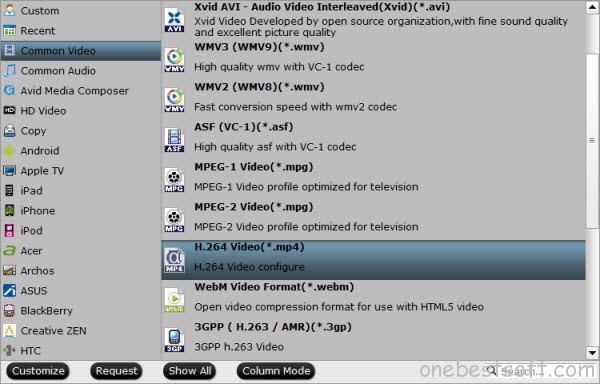 3. Convert DVD movies to Seagate Wireless PlusAfter all necessary settings, you can just click the "Convert" button to start converting your DVD movies. After the conversion, click Open to get the output files for your Seagate Wireless Plus.4. Connect Seagate Wireless Plus to computer for uploadingNow you can copy the converted DVD files to your Seagate Wireless Plus via USB.Tip: Free apps are available across Android, iOS, and Kindle for download, and after downloading the app, users can view available wireless networks and select the Seagate Wireless. And content can be played in many different ways, via the Media app on iOS, Android, or Kindle Fire, via any browser, via Apple Airplay or to any DLNA devices via minidlna, which is built into the OS.
 To play your converted files on your mobile devices, your just need to tap the movie file and play it. Now you have successfully carry your entire DVD media library with you with the Seagate Wireless Plus Portable Hard Drive. Just enjoy while traveling with your family!Want to get more DVD entertainment? Rip DVD to your Nexus 6/9, iTunes 11/12 library or Drobo 5n and TV! Read More:
Source: http://onebestsoft.com/upload-dvds-to-seagate-wireless-plus/
To play your converted files on your mobile devices, your just need to tap the movie file and play it. Now you have successfully carry your entire DVD media library with you with the Seagate Wireless Plus Portable Hard Drive. Just enjoy while traveling with your family!Want to get more DVD entertainment? Rip DVD to your Nexus 6/9, iTunes 11/12 library or Drobo 5n and TV! Read More:
Source: http://onebestsoft.com/upload-dvds-to-seagate-wireless-plus/
Cannot play your MPG/MPEG videos on surface 3? You lost your audio files when transferring MPG files to surface 3? This guide aims to solve all the issues to play our mpeg/mpg files so nicely on surface 3. “I got many MPG/MPEG videos and want to play them on Microsoft Surface 3, tried many softwares to transfer the MPG/MPEG videos to Microsoft Surface 3, but of low quality, is there any other software to solve this problem and help me out? Thanks in advance. Why MPEG/MPG won’t play on Surface 3?”The reason you cannot play MPG/MPEG video on Surface 3 is simple; the player built in Surface 3 cannot find a suitable decoder for the file. So you will meet kinds of errors when you playing them on Surface 3. With the surface tablet has own supported video formats, we would like to accomplish the MPG/MPEG conversion task using a professional MPEG/MPE to surface converter to work the job well.How to convert MPG/MPEG to H.264 MP4 on Surface 3 so nicely?Free download the professional Surface Converter— Pavtube Video Converter Ultimate, which could be a nice transcoder to decode MPG-MPEG to H.264 MP4 for playback on surface 3. It can convert all kinds of video files to Surface supported video or audio formats like convert MKV to Surface, convert WMV to Surface, convert AVI, FLV, WTV, etc. The following is the detailed steps on the basis of Window platform to teach us how to play the MPG/MPEG files well. Here is review. Other Download:- Pavtube old official address: http://www.pavtube.cn/blu-ray-video-converter-ultimate/- Cnet Download: http://download.cnet.com/Pavtube-Video-Converter-Ultimate/3000-2194_4-75938564.htmlSimple steps on converting MPG/MPEG videos to Surface 3 supported H.264 MP4:Step 1. After downloading, install and run the MPG/MPEG to Surface 3 Converter on your PC, then click “Add Video” button to load your MPG/MPEG files. You can also add videos formatted in MKV, FLV, AVI, MTS, WMV, TiVo, MXF, VRO, VOB and more. The software supports batch conversion so you can convert several files in one go. Step 2. If you want to select the optimized preset for Surface 3, you can click the format icon in the “Output Format” pane, open the drop-down format list, and then go to “Format -> Windows > Microsoft Surface 2 Windows RT H.264 Video (*.mp4)” to use it. This preset is specially designed for Surface 3 Tablet.
 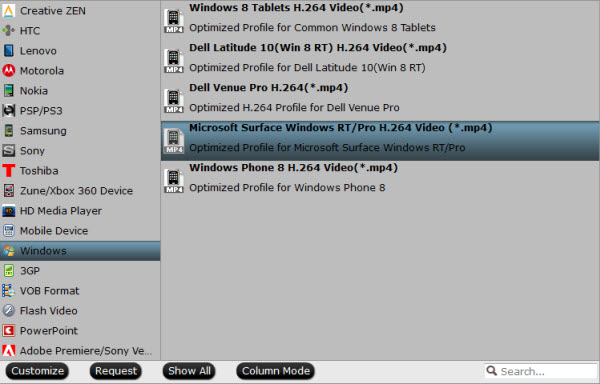 Meanwhile, you may press “Settings” and change the audio/video parameters. The task info shows estimated sizes of each file. Generally the lower bitrate you use, the smaller the output video is, and the less space it takes. Just adjust all the audio and video parameters as you like.Hit “Convert” to convert MPG/MPEG files to Microsoft Surface 3. When the conversion is over, an “Open” option will be available. You can directly hit it to find the output files. And then, you can transfer files to surface 3. With this easy to use converting program, are you still worrying about the troubles of importing MPG/MPEG files to Surface 3? Let’s have a try!Further reading:
Source:http://bestvideosolution.blogspot.com/2015/03/play-mpg-mpeg-movies-on-microsoft-surface.html
Meanwhile, you may press “Settings” and change the audio/video parameters. The task info shows estimated sizes of each file. Generally the lower bitrate you use, the smaller the output video is, and the less space it takes. Just adjust all the audio and video parameters as you like.Hit “Convert” to convert MPG/MPEG files to Microsoft Surface 3. When the conversion is over, an “Open” option will be available. You can directly hit it to find the output files. And then, you can transfer files to surface 3. With this easy to use converting program, are you still worrying about the troubles of importing MPG/MPEG files to Surface 3? Let’s have a try!Further reading:
Source:http://bestvideosolution.blogspot.com/2015/03/play-mpg-mpeg-movies-on-microsoft-surface.html
The 10.6-inch Surface 2's 1920*1080-pixel screen is great for watching movies. However, you have to face up to the fact that Surface 2 video format is limited to MP4, 3GP, WEBM, H.263, H.264 video, things happens when you can not play MKV files properly.To get MKV playable on Surface 2, there are two ways: one is to find a Surface 2 MKV Player, another is to do MKV to Surface 2 converting.Solution 1: Search a Surface 2 MKV Player from the Windows store to enjoy MKV on this Windows 8.1 RT Tablet. Here, mobile.HD Video Player it one and you can play mkv and other popular video format on Surface/RT/Windows 8 computer with it.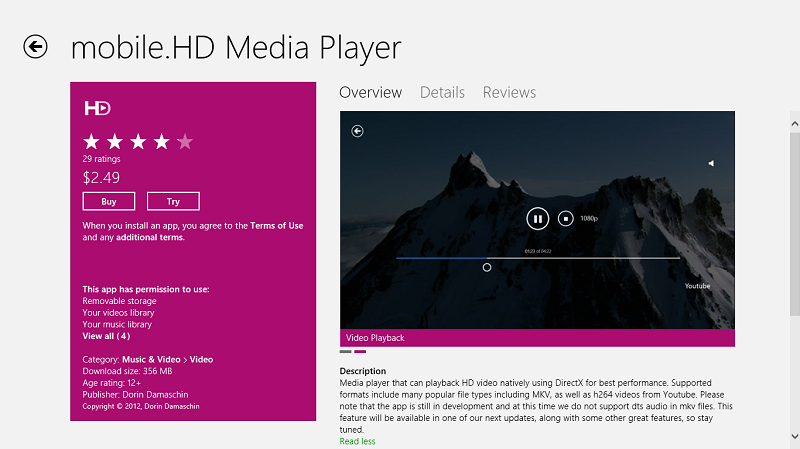 Price is $2.49 with free trial...the developers said more improvements and features will be added soon.But I haven't it try yet... and 356 MB for video player is kind of ridiculous... someone says they may miss audio when playing MKV on Surface 2 with it.Therefore, if you plan to put and watch MKV movies on Surface 2, the method 2 is the best and easiest.Solution 2: Convert MKV to MP4, which is the most suitable format for Surface 2 playback. To accomplish the job, here we will recommend you this MKV to Surface 2 Converter, a professional Surface 2 Video Converter which handles not only MKV files, but also can convert MXF/MTS/VOB/WMV/FLV/Tivo/M4V/MPG to the most suitable profile for Surface 2 on Windows 8.1 RT with simplest workflow and reliable video quality. Here is review.If you are Mac users, try MKV to Surface 2 Converter for MacGet a free trial and follow the guide to convert MKV to Surface 2 on Windows 8.1Step 1. Run this Pavtube Video Converter Ultimate as the Surface 2 Ultimate Converter; import videos.Click "Add video" or "Add from folder" to import source videos.Step 2. Choose video format.Click the drop-down list besides "Format", select Windows > Microsoft surface windows RT/pro H.264 HD Video (*.mp4) as the best profile for Surface 2.
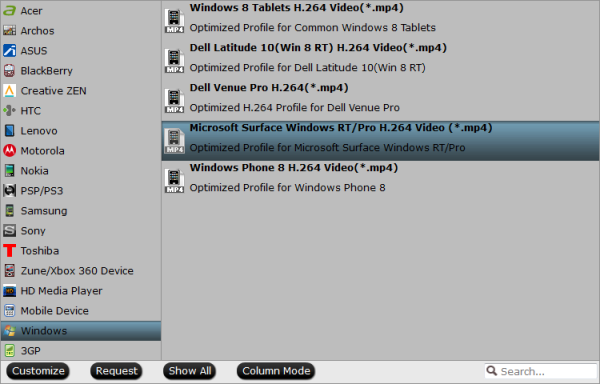 Step 3. Edit video before conversion. (Optional)Click the pencil-like icon on top to enter Video Editor interface. You can choose to trim, crop, watermark, effect, audio or subtitles before conversion.Back to main interface, click "Settings" to customize video size, frame rate, bitrate and other settings.Step 4. Start conversion.Click "Convert" to start converting MKV to MP4 for Surface 2. Wait for a few moments, and click "Open" or "Open output folder" to quick locate the converted video.More articles:
Source: http://bestvideosolution.blogspot.com/2013/11/watch-mkv-on-surface-2.html
Step 3. Edit video before conversion. (Optional)Click the pencil-like icon on top to enter Video Editor interface. You can choose to trim, crop, watermark, effect, audio or subtitles before conversion.Back to main interface, click "Settings" to customize video size, frame rate, bitrate and other settings.Step 4. Start conversion.Click "Convert" to start converting MKV to MP4 for Surface 2. Wait for a few moments, and click "Open" or "Open output folder" to quick locate the converted video.More articles:
Source: http://bestvideosolution.blogspot.com/2013/11/watch-mkv-on-surface-2.html