Showing posts with label convert dvd to surface pro. Show all posts

Viewing DVD movies on Surface 3, Surface Pro 3 in best quality

Surface 3 & Surface Pro 3 would be your best choice to your collection of HD video file with high quality when traveling or on a bus. Read our Surface Pro 3 vs Surface 3 comparison to choose one. If you’ve made up your mind to get this outstanding tablet, just read on to learn how to rip and play DVD movies on Surface Pro 3 with the best video quality. 


Read the Software review>> Pavtube DVDAid vs AnyDVD | ByteCopy & MakeMKV | Best Video Converter Ultimate Reviews...
  
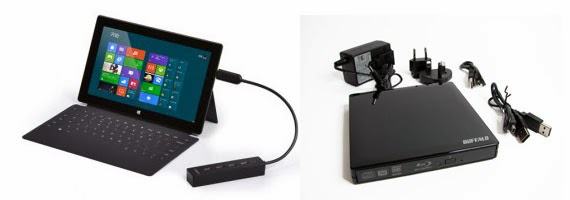
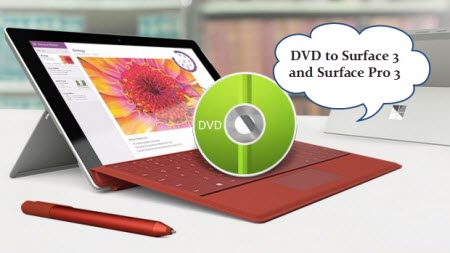
However, Surface Pro 3, Surface 3 doesn't have a built-in DVD-ROM or DVD player for playing DVD movies directly. Get frustrated? Fortunately, there is a best work-around is that convert DVD to Surface 3 or Surface Pro 3 supported video formats like MP4 for smoothly playback. So, you need a Top DVD Ripper for Surface to finished the DVD to Surface Conversion.  

A professional DVD ripper is needed to at least guarantee the compatible with the new Windows 10 Surface Hub and other Surface series (like Surface 3, Surface Pro 3, Surface Pro 2, Surface 2, etc.), fast conversion speed and high output image effect. Here, Pavtube DVDAid is recommended to you without preamble. With intuitive and easy-to-navigate interface, this program can easily rip DVD to Surface 3 and Pro 3 friendly format like MP4 at fast speed. The shining point of this DVD to Surface ripper lies in its unique ability to decode any copy-protected DVDs. Therefore, you can import any DVD to Surface 3 and Surface Pro 3 for watching at will. 

If you are using a Mac, please turn to the equivalent Mac version Pavtube DVDAid for Mac to copy DVD to Surface 3/Pro 3 tablet on Mac OS X (including Yosemite 10.10). Get the DVD ripper now and freely enjoy your favorite DVD movies on your Microsoft Surface Pro 3. Just get it and follow the simple tutorial below to copy DVD movies to Surface 3/Surface Pro 3 for playing in just a few clicks! 

Free download this Top DVD Ripper for Surface


How to transfer DVD to compatible MP4 preset for Surface 3/Pro 3

Step 1: Run this DVD to Surface 3/Pro 3 Converter; load DVD disc. 

Click the top left icon, you can choose to import DVD from ROM, DVD folder or DVD ISO/IFO. It will check the main title by default; moreover, ISO files could also be recognized automatically so that you no longer need to run virtual drive to mount it. 


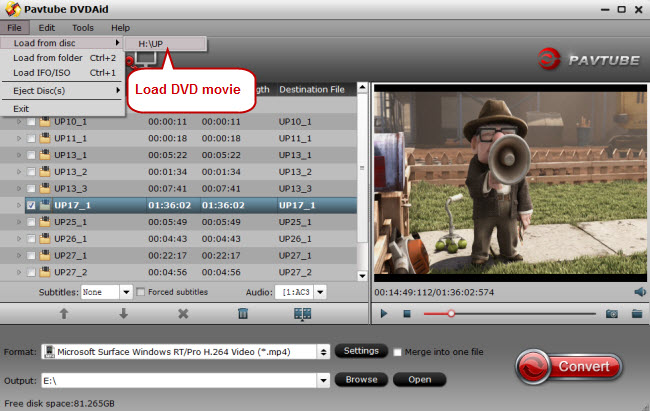
Tip: Pavtube DVDAid Directly Copy function: supports lossless VOB backup from original DVD with multiple audio tracks preserved. If you want to backup DVD main movie for further playback or editing, Directly Copy fits you best. 
  
Step 2: Choose output format

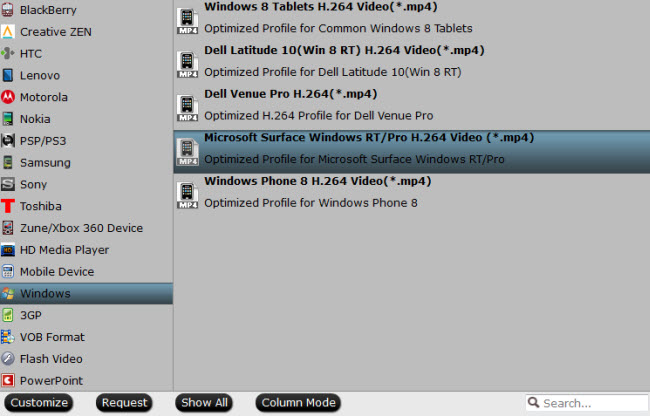
Click "Format" bar, you can get optimized videos for your surface under "Windows > Microsoft Surface Windows RT/Pro H.264 Video (*.mp4)". The output videos could fit on Surface 3/Pro 3 perfectly. If you like, you can click "Settings" to change the video encoder, resolution, frame rate, etc. as you wish. 


Step 3: Start Conversion

You can hit the big red "Convert" to start converting DVD to Surface 3/Pro 3 MP4 with best video settings. After the conversion, click "Open output folder" in the conversion window, or "Open" in main interface to quick locate the converted video. After getting the converted movies files, you can transfer them to Surface 3/Pro 3. 


How to get DVD/CD disc to Surface Pro for playback

Ever tried to play DVDs or CD discs on a Surface Pro? Obviously, you need attached hardware or turn to some software for help. This article will provide two method for you to get DVD/CD playback on your Surface Pro.

Since the Windows 8 and 8.1 released, Microsoft has made its decision to remove the ability of playing DVD and CD discs. Without the function built into it, you have to ask for the third party software and additional hardware to accomplish it. 

Obviously, the Surface Pro does not have the specific hardware needed to insert DVDs or CD discs, and this is reportedly one of the reasons why Microsoft didn’t include software to play physical media discs in Windows 8.

Below I will show you the way to enjoy DVD/CD on Surface Pro with Win 8.1 Pro OS.

The Hardware

The Surface Pro only has a single USB port. So, if you want to utilize more than one USB device you’ll need a good USB hub. Here we choose the Satechi 4-port USB 3.0 hub. The Satechi includes enough port access to provide multiple options for additional devices attached to the Surface Pro. With it, you can easily plug the external USE DVD/CD drives, mouse, etc. as you like.


For DVD/CD playback, you also need a good external DVD drive. Portable USB ones are recommended due to their easy to transport. The 6X read speed is necessary for DVD playback and the higher the better. You can choose from amazon.com like LG, Samsung, Pioneer, etc. You can also do your own research on the proper DVD/CD device to fit your lifestyle, or you can take my word for it and grab it from Amazon.com. Below is an example for you.

Surface tablets are really convenient and you can download or install 99% of what you need right from the network. However there are times where you might need to access data or install software from DVD/CD to your Surface tablet.


The most obvious way to do this is with a Portable DVD/RW External Drive. You can just plug it into the handy USB port and as long as it’s on the supported hardware list, you will see it pop up in Explorer on the desktop as a drive. This will work for Surface RT/2 or Surface Pro/Pro2 tablets just like from any other Windows computer. Though, you will only be able to actually install software if you have a Surface Pro/Pro2.

On Surface RT/2, you can not install software without going through the Windows Store.

What if you don’t have a Portable DVD/RW External Drive? No problem, we have a method to get the data to your Surface tablet without a USB DVD/CD drive.

This method does require access to a computer with a DVD/CD drive (I’m good but not so good I can teach you how to magic the data off of the disc without a drive). I’m assuming that it will be a Windows machine but even if it’s not, the ideas will carry over, although the steps will be different.Access data or install from DVD/CD to Surface

This method involves using software on a desktop or laptop with a DVD/CD drive to create an ISO file. An ISO file is essentially a copy of a whole CD or DVD without the disc. Your Surface can then mount the ISO file as if it were reading a real disc.

On a Surface RT/2 this means you can read files or play MP3s and on a Surface Pro/Pro2 you can also install programs. I’ve been using this technique to install some of my old games on my Surface Pro 2 (Evil Genius, for example) that I can’t get on Steam.

To do this, you will need to download some ISO creation software. I’m using ISO Toolkit from www.AskVG.com in this post for a few reasons…
  • It’s free.
  • It’s pretty simple to use.
  • It’s portable (doesn’t need to be installed on a machine, just run the .exe)
  • It doesn’t try to trick you into installing extras like toolbars.

OK, let’s get started…

Create an ISO File

From the desktop/laptop computer with a DVD/CD drive, download ISO Toolkit.
Open the zipfile and copy the ISOToolkit.exe file to the desktop.
Make sure the DVD/CD you want to copy is in the drive.
Run it. You may get some security alerts as the program needs to access the DVD/CD drive.


  • Select the Copy Image tab.
  • Make sure the DVD/CD drive is selected.
  • Tap or click the Select button to pick the location where the ISO file will be created as well as it’s name.
  • Tap or click the Copy Image button to start the ISO creation process.
  • Wait until the copy is complete. It can take a while (especially for a DVD) so be patient.

That’s it. You’ve created your ISO file. Now you can get the file to your Surface tablet with SkyDrive or a USB stick, then do the procedure below to access it. Be aware that you can’t use SkyDrive to transfer the ISO file if it’s over 2GB in size.

For the next part, I’m going to assume you used a USB stick to copy the file over to your Surface.

Mount an ISO on your Surface

  • Go to desktop mode.
  • Plug in the USB key with the ISO file on it.
  • From Explorer, browse to and then tap and hold on the ISO file (right click).
  • When the right-click menu appears, tap Mount.


Your Surface will mount the ISO file as if it were a DVD/CD in a drive. In fact, if you look at the screen shot below, you’ll see it even labels it “DVD Drive”


That’s pretty much it, at this point, you can treat it as if it were a real DVD/CD drive. When you’re ready to eject the ISO, just tap and hold on the drive in explorer and you’ll get a menu like the one to the right. Just tap on Eject and the drive will vanish.


I hope you found this post helpful.

I know it’s kind of an esoteric thing but, I had someone ask me how to get data from old discs to be accessible from their Surface and I thought others might appreciate it as well. Oh, and in case you’re wondering if I was able to get Evil Genius to work this way…


The Software
The last piece of getting your Surface Pro to actually play DVD/CD discs is to install software that will actually perform the function that Microsoft left out of Windows 8.1. In this case, there's only one thing you need - a DVD to Surface Pro Ripper to remove disc encryption, to transcode DVD to Surface Pro friendly format. Pavtube DVD Ripper is just such kind of easy-to-use program to help you do the conversion in a few clicks.

Why we choose Pavtube DVD Ripper? Pavtube DVD Ripper is a professional Blu-ray/DVD ripping, converting and backing up tool that works on Windows. it can rip and convert latest DVD movies to iPad Air supported MP4/M4V/MOV and other popular video formats like AVI, WMV, MKV, FLV, SWF, 3GP, etc. for playback anywhere. Also, it comes with a built-in editor that allow you to edit your Blu-ray movies by trimming, cropping, adjusting video effects, adding srt/ass/ssa subtitles etc. What’s more, its high conversion speed and easy-to-use features have won much Windows users praise. (See Top 5 DVD Ripper Reviews)

Good news: just found it’s on 30% OFF Summer Holiday promotion sales; don’t miss it!

No need to set the specs manually, no need to figure out which bitrate/framerate/resolution is best for Surface Pro. DVD to Surface Pro Converter integrates the best presets for Surface Pro for you. All you need to do is:

  • Import
  • Choose preset
  • Click and go! It’s just as simple as that.

Tips:


Here is a tutorial to rip & convert Blu-ray to Surface Pro 2, just take it as reference.

Related Articles:

Microsoft Surface Videos and Movies Playback Tips
Transfer MKV, AVI, VOB, Tivo, WMV, MPG, MTS, FLV/F4V videos to Surface 2
MKV to Surface- Play MKV files on Surface Pro 3 
Enjoy Blu-ray to Surface 2 for watching 
Convert/Rip and Play Blu-ray movies on Surface Pro 3