Showing posts with label Surface Pro 2. Show all posts

Rip Warner Brothers Blu-ray to play on all Windows 8.1 tablets

This article aims to teach you how to rip Warner Brothers Blu-ray to Windows 8.1 tablet supported video formats so that you can enjoy Blu-rays wherever you go.

All the Warner Bros. movies on Blu-rays soar to the top Blu-ray sales chart and are definitely worthy of collecting. To tell you another piece of good news, besides watching the Warner Brothers Blu-ray movie via the BD player at home, you can also play WB Blu-ray on your all Windows 8.1 tablets like Transformer Book T200, Surface Pro 3, Lenovo Yoga 3 Pro, Dell Venue 11 Pro, Lenovo ThinkPad 10, Lenovo ThinkPad Yoga, Transformer Book Chi T300, etc. to get more fun on the move. Wanna know how to fulfill this task? Just follow me.

play WB Blu-ray on Windows 8.1 tablets

After trying a few Blu-ray rippers, I put Pavtube BDMagic at the top of the list. (Read top Blu-ray Rippers review) With intuitive user interface, this Blu-ray/DVD ripper program enables you to rip Warner Brothers Blu-ray like Man of Steel, Pacific Rim, Despicable Me 2, Monsters University, Frozen, etc, to Windows 8.1 tablets compatible mp4 format with great ease, irrespective of the copy protections. Therefore, you can play Warner Brothers Blu-ray on Windows 8.1 tablets anytime anywhere. Mac version is BDMagic for Mac.

Copy and Rip Warner Brothers Blu-ray to play on Windows 8.1 tablets 


Step 1. Add Blu-ray movies

Place the disc from the BD drive, launch the Blu-ray Ripper for Windows tablets. and then click "disc" button to import Blu-ray movies into the program. DVD discs, ISO and IFO files are also supported.

Blu-ray Ripper for Windows tablets

Step 2. Choose output format

Generally speaking, MP4 is supported by almost all Windows 8.1 tablets. Here you can choose "H.264 Video (*.mp4)" from "Common Video" as the output format. Also, this Blu ray converter provides optimized formats for Asus, Lenovo, Microsoft brand Windows devices; choose a proper one as you need. Or depends on your device, you can choose a suitable video format from "Windows" catalogue.

Windows tablets video format


Step 3. Profile Settings (Optional)

Click "Settings" to change the video resolution, bit rate, etc. for full screen playback smoothly or select the corresponding device as the output format. Please remember the file size is based more on bitrate than resolution which means bitrate higher results in bigger file size, and lower visible quality loss.

Step 4. Start to rip Warner Brothers Blu-ray for play on Windows 8.1 tablets

The final step is to tap the Convert button and commence converting WB Blu-ray  to Windows 8.1 tablets. When the conversion finished, you can click "Open" to locate the ripped files and easily transfer them to your Windows device. In this way, you can easily play Warner Brothers Blu-ray movies on Windows 8.1 tablets without limitation.

Tips:

a. You can choose the subtitles which you want to keep. Just click the drop down menu after “Subtitles” to select your desired one.

b. Click Edit button and you can trim, crop or adjust the video with the built-in video editor to get the very part and effect of the Blu-ray movie you want.

c. Even Digital Copy and H.265/HEVC videos can be played on Windows 8.1 tablets, just take a look.

Convert/Put iTunes video music to Surface Pro 2 for watching

A quick tutorial on how to remove iTunes DRM protection, convert and put iTunes video movie music to Surface Pro 2 files formats for enjoying on the go.

When you get the Surface Pro 2, you may want to watch your favorite movies on it. However, Surface Pro 2 doesn't play movies purchased from Apple iTunes store. What if you have lots of iTunes movies and want to transfer them to Surface Pro 2 for playback? Why Surface Pro 2 doesn't support iTunes video files? How to transfer iTunes videos to Surface Pro 2 easily? In this article, you will find all the answers.
Put iTunes video music to Surface Pro 2

Surface Pro 2 doesn't play iTunes movies due to the DRM protection. Because of Apple DRM, videos and movies bought from iTunes store can only play on Apple products. Besides, most iTunes purchased videos are in M4V format while Surface Pro 2 prefers MP4.

How to Transfer iTunes M4V to Surface Pro 2 with Pavtube ChewTune
 

Part 1. Preparation

To put iTunes movies on Surface Pro 2 for playback, you need to both unlock the iTunes movie DRM and convert M4V to Surface friendly MP4 format. To do this, you need an all-in-one DRM removal and video converter.

Here we recommend iTunes to Surface Pro 2 Recorder, a professional DRM Video Recorder which helps break the DRM protection 
from rented and purchased M4V videos
 and also recorder M4V video to MP4 format as the most compatible format on Surface Pro 2. Good news for you: To save your money, Pavtube Special Offer offers various product bundles, such as:

A command window will pop up during the installation to install specific audio driver, do not shut down and let it running until the installation completed.

install Audio Driver

Part 2. Tutorials: Remove DRM and Record iTunes M4V Video to Surface Pro 2

Step 1. Load .m4v videos.

Run this Pavtube Chewtune as a top DRM Removal Software and DRM Video Recorder(Mac version is here), and add videos. Drag and drop your videos to it directly, or you can click icon to import them as below.

DRM Removal Software

Step 2. Choose format.

Click the drop-down-list besides "Format" and choose "Windows > Microsoft Surface Windows RT/Pro H.264 Video (*.mp4)" as the most compatible format with Surface Pro 2.

compatible format with Surface Pro 2

Step 3. Change video specs.

Click "Settings" to enter Profile Settings window, you can find settings for video size, codec, bitrate and frame rate.

Step 4. Start iTunes M4V to Surface Pro 2 recorder.

Now click the "Convert" icon to start removing DRM from iTune M4V videos and recording iTunes videos to Surface Pro 2 for playing; this DRM Video Recorder will activate your iTunes automatically and start to play this video. The player windows cannot be removed or closed.

In the meanwhile, it will start to record this video in MP4 real-time. The conversion time is equal to the video length itself; you can do other tasks during the converting the process.

Note: The system volume could turn off temporally during this period; no worries, do not touch it to get perfect DRM removed video.

After the conversion, click "Open output folder" to quick locate the converted video and copy to your Surface Pro 2 for watching on the go.

Tips:

1. The DRM removing process may mislead your anti-virus software to falsely report virus/worm. Please ignore the report to keep on ripping.

2. This product cannot convert unplayable video (damaged, unauthorized, etc).

More reading:

Remove DRM from Surface Pro 3: This iTunes to Surface tutorial will show you how to put purchased or rental iTunes m4v movies on Surface Pro 3 for playback on the go.

Remove DRM from Surface Pro 3: Need to remove DRM and record Blu-ray/DVD Digital Copy movies to Surface Pro 3for watching freely? Take it easy. This guide will instruct you step by step.

Remove DRM from Surface Pro 3: This article aims to help Surface users to look for an easy and quick way to play Amazon videos on Surface Pro 3 through remove DRM protection and convert them to Surface supported format. 

Easy Way to Put and Play VOB to Surface Pro 2 Tablet


Can’t find a VOB player app for your Surface Pro 2? Here is an alternative way for finding a VOB player- Convert VOB to Surface Pro 2 playable format.

I was hoping to be converting VOB video over onto my Surface Pro 2 before I leave on a business trip Saturday. Is there any way?


Playing a .vob file on Surface Pro 2 is a very common problem likely to be faced by majority of Windows 8.1 users at some point of time in their life. Obviously, VOB is not a Surface-friendly format and the only way is to transcode the VOB files to a format that Surface Pro 2 appreciates.

But it's not a big deal; after widely searching and multiple testing, we found a tool named Pavtube Video Converter Ultimate, or you can name it a VOB to Surface Converter. It's capable of quickly converting your DVD VOB files to best MP4 files for playback on Surface Pro 2 with best video quality and simplest workflow.

FYI: You can reach the Mac version here: VOB to Surface Pro 2 Converter for Mac.

Tutorial: How to transfer DVD VOB Video files to Surface Pro 2 for watching

Step 1. Run this VOB to Surface Pro 2 Converter; add videos.

You can click "Add Video" to import your source materials in .vob format. Drag-and-drop is also supported. Batch conversion is supported so that you can add multiple files.


Step 2. Choose Surface Pro 2 MP4.

Click the Format drop-down list, choose "Windows>Microsoft Surface Windows RT/Pro H.264 Video (*.mp4)" which works well for Surface Pro 2. Or you can choose other presets if you don't need full size videos.


Step 3. Customize video specs (Optional).

Your can click "Settings" to free change video size, bitrate, frame rate and others.

Step 4. Edit source video or adjust target video settings (Optional)

Pavtube Video Converter Ultimate provides basic editing functions before conversion; you can enter the video editing window by hitting the pencil-like "Edit" icon on the top to free trim, crop, add watermark, edit audio and subtitles.

Step 5. Start Conversion.

Now hit the big red "Convert" to start converting VOB video to MP4 for Surface Pro 2. After conversion, you can click "Open output folder" to quick locate the converted video and copy the generated MP4 file to your Surface Pro 2 for watching anywhere.

How to transfer media files to Surface Pro 2

More related:
How to Rip and Convert DVD to Surface Pro 2
Tricks for playing Blu-ray movies to Microsoft Surface Pro 2

How To: Run Battery Report on Surface Tablets

Surface RT and Surface 2 use an internal lithium-ion battery designed to go everywhere you go. The amount of time your battery lasts varies depending on the kinds of things you do with your Surface. Here gives the way to run Battery Report on Surface Tablets. 

Have you wondered how your Surface tablet’s battery is doing? Has it seemed to be going dead more rapidly lately but, you don’t know for sure?


Well, if you’re having problems or just curious, you can always run a battery report against your Surface tablet.

A battery report is very helpful for helping you figure out how your battery(s) is performing by showing you things like…
  • A 72 hour graphic usage history including charges and drains
  • How much power (in mWH) your battery(s) is holding
  • Capacity history (good for seeing if your battery is failing)
  • Estimates on how long the battery should last
As you might imagine, this can be quite helpful in determining if you are having a problem with your battery and may be requested of you if you contact Microsoft tech support with problems like:
  • Short battery life
  • Frequent reboots
  • Overheating issues
OK, now that you know what it’s good for, you can follow these steps to run a battery report on Surface RT/2 or Surface Pro/Pro2 tablets.

Run Battery Report on Surface Tablets:
  • Bring up the search charm
  • Search for cmd  
  • Chose Command Prompt from the search results
  • In the Command prompt window that came up on your desktop, type in “powercfg /batteryreport” and hit Enter
  • It will generate a report file and tell you where it is located. Usually it will be placed in the c:\users\ folder and it will be named battery-report.html

  • Browse to that location and open the report
I hope you found this procedure helpful.

Personally, since it only goes back 72 hours for most things, I recommend running a battery report every month or two and keeping them so you can compare trends over a long period of time. It could be very helpful if you are trying to determine if your battery is starting to fail at some point in the future.

Surface Pro 2 and Surface Pro 3 Comparison

Here is Surface Pro 3 vs Surface Pro 2 comparison review: which is the best Windows 8.1 tablet you should choose? Keep on Reading.

The Microsoft Surface Pro 3 has just been announced, and it marks yet another step forward for the company's tablet line. Naturally, the Surface Pro 3 improves upon the characteristics of its predecessors in every way - from the design, through the internals, to the screen and input methods. The Surface Pro 3 is yet another beautiful tablet by Microsoft, but it looks like with that third installment in the series, the company from Redmond is aiming higher than ever - the Pro 3 is a tablet designed to make the laptop obsolete - once and for all.


With the impending release of the Surface Pro 3 on June 20th, the inevitable “should I upgrade” questions are beginning to fly around among existing Surface Pro 2 owners.

The answer to the question is, of course: “it depends on what you want or need“.

Microsoft has put together this tool to help you decide which model (Surface 2 or Surface Pro 3) would best fit you if you were starting fresh. Although useful, unfortunately, it does little to help you decide whether or not to upgrade from a Surface Pro 2 to its successor.

So, to help you, if you’re struggling with that decision, I’m going to do a feature comparison of the Surface Pro 2 and Surface Pro 3 to shed some light on the differences, advantages, and disadvantages of both. That way, you’ll be able to make an informed decision - one that will be right for you.

I’ll start with a quantitative analysis of the technical specifications; then I’ll break that down into several sections for a bit more in-depth discussion.

In my next post, I’ll give you my opinions on the differences and in what instances I would recommend an upgrade. For now, however, let’s just stick (mostly) to the facts.

Surface Pro 2 and Surface Pro 3 Comparison: Technical Specifications

To make the technical differences (and similarities) easy to pick out, I made the Surface Pro 2 and Surface Pro 3 comparison table below. I highlighted the changes between the Surface Pro 2 and Surface Pro 3 in red to make them easier to see.


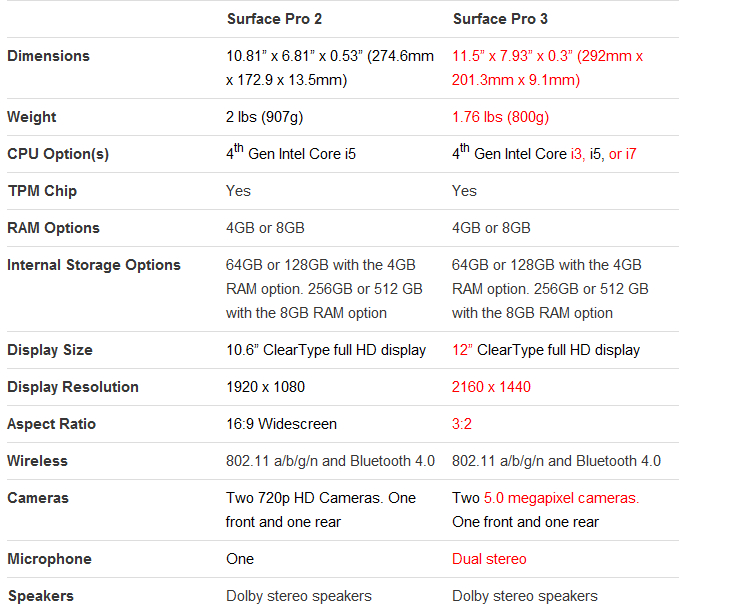
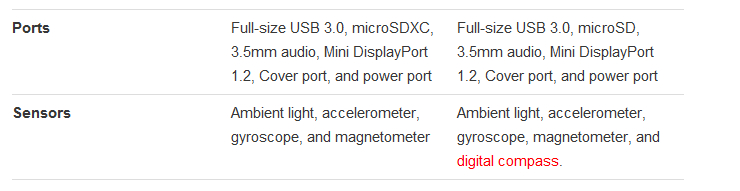
When you look at the numbers side by side, it’s pretty obvious that there are some significant differences but, just as important, there are some significant similarities as well.

Surface Pro 2 and Surface Pro 3 Comparison: More Configuration Choices


One of the things that will make the Surface Pro 3 attractive is the sheer number of configuration options available.

It seems that Microsoft increases the options with every iteration. The original Surface Pro had two options, the Surface Pro 2 had four options and now, the Surface Pro 3 offers five different configuration options. You can see the different options along with the price for each in the next section.

Surface Pro 2 and Surface Pro 3 Comparison: Pricing


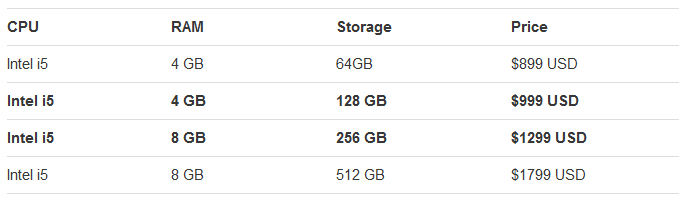
Despite the number of options available for a Surface Pro 3, the pricing has stayed (pretty much) right on par with the Surface Pro 2.

To prove this, I’ll look at pricing for the Surface Pro 2 and Surface Pro 3 while paying attention to where the product lines overlap.

First, the pricing for the Surface Pro 2…


Now the pricing for the Surface Pro 3…

CPURAMStoragePrice


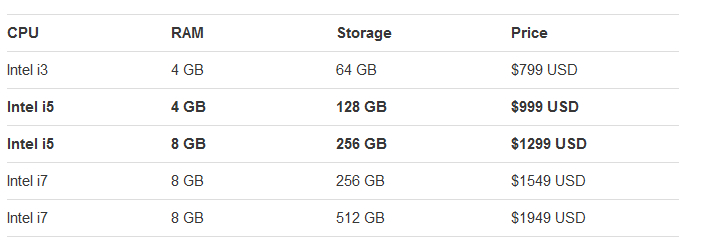
Notice that where the specs overlap (I bolded those lines), the price models are the same. To me, anyway, this indicates the Microsoft isn’t gouging us too badly on the new model’s pricing.

Of course, I would expect that Microsoft will start discounting the Surface Pro 2 when the Pro 3 actually hits the shelves but for now the tables above are pretty accurate. Interestingly, Microsoft store removed the original RT and the Surface Pro 2 lines from their online store (you can still get the Pro 2 but you really have to dig). I am not sure what that means.

Surface Pro 2 and Surface Pro 3 Comparison: Form Factor (Size & Case) Changes


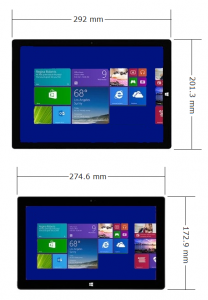
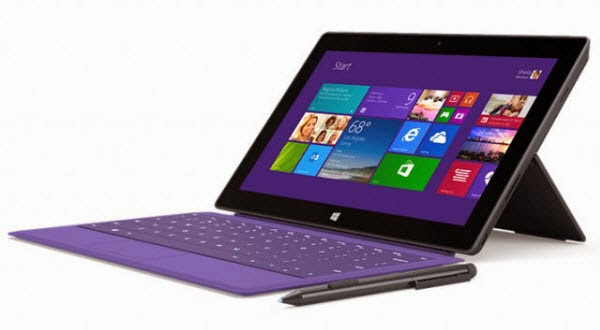
Side by side, the first thing you’ll notice is how much larger the Surface Pro 3 is in comparison to the Surface Pro 2. If you look to the illustration on the left, you can see that the Surface Pro 3 is considerably larger than the Surface Pro 2 when viewed from the front.

In fact, the Surface Pro 3 is about 16% taller and 6% wider than the Surface Pro 2.

However, if you look at thinness, the Surface Pro 3, is about 33% thinner than it’s predecessor. That’s quite an engineering feat that Microsoft pulled off considering they’re claiming as much power and an even longer battery life with the Surface Pro 3 line.

Also, while the material is identical, the Surface Pro 3 has a silver colored magnesium case as opposed to the black one offered with the Surface Pro 2. A cosmetic change to be sure but one that seems to work for the larger tablet.

Surface Pro 2 and Surface Pro 3 Comparison: Weight


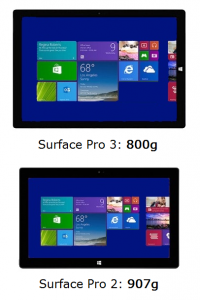
In addition to making the new Surface thinner, Microsoft reduced the weight by 13(ish)% in the Surface Pro 3.

Considering how much larger the Surface Pro 3′s face is, that’s another impressive upgrade from Microsoft.

It also means that Microsoft had to do some serious shoehorning to get everything packed in there so thin. That might mean that the Surface Pro 3 could develop some heat related issues with the high-end processors - there isn’t as much space to get the heat out.

Maybe Microsoft has already figured out how to deal with the component density and has a good way to make sure everything stays cool. We just don’t know yet and won’t know until June when the general public gets their hands on the new tablets and starts using them in the real world.

Surface Pro 2 and Surface Pro 3 Comparison: Screen Changes


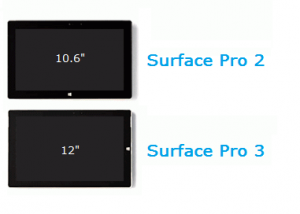
The Surface Pro 3′s 38% bigger screen is probably going to be great for things you might normally use a laptop for but it might end up being a bit large for a tablet screen.

On the plus side, the 3:2 aspect ration will lend itself to better reading of documents in portrait mode as a standard 8.5″ x 11″ sheet of paper should fit on screen at just about full scale.

As far as screen resolution goes; the Surface Pro 3 sports 2160 x 1440 pixels compared to the 1920 x 1080 pixels of the Surface Pro 2.

Never missing an opportunity to brag, Microsoft PR folks have been stating that the Surface Pro 3′s display has “50 percent more pixels” than the Surface Pro 2. While true, let’s not forget that the Surface Pro 3′s screen is much larger than the previous model’s screen.

As a result, the Surface Pro 3 has only a slight advantage in pixel density (216 ppi vs 208 ppi) over the Surface Pro 2′s screen. That variance is so small, no one will be able to see a difference in sharpness between the two screens.

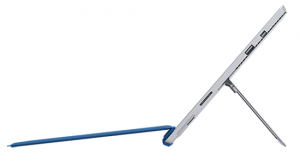
Surface Pro 2 and Surface Pro 3 Comparison: Kickstand Changes


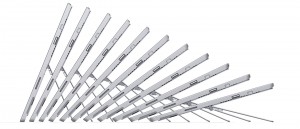
The Surface Pro 2 had a dual-position kickstand which was an improvement over the first Surface Pro (which only offered one (rather awkward) setting on 22′).

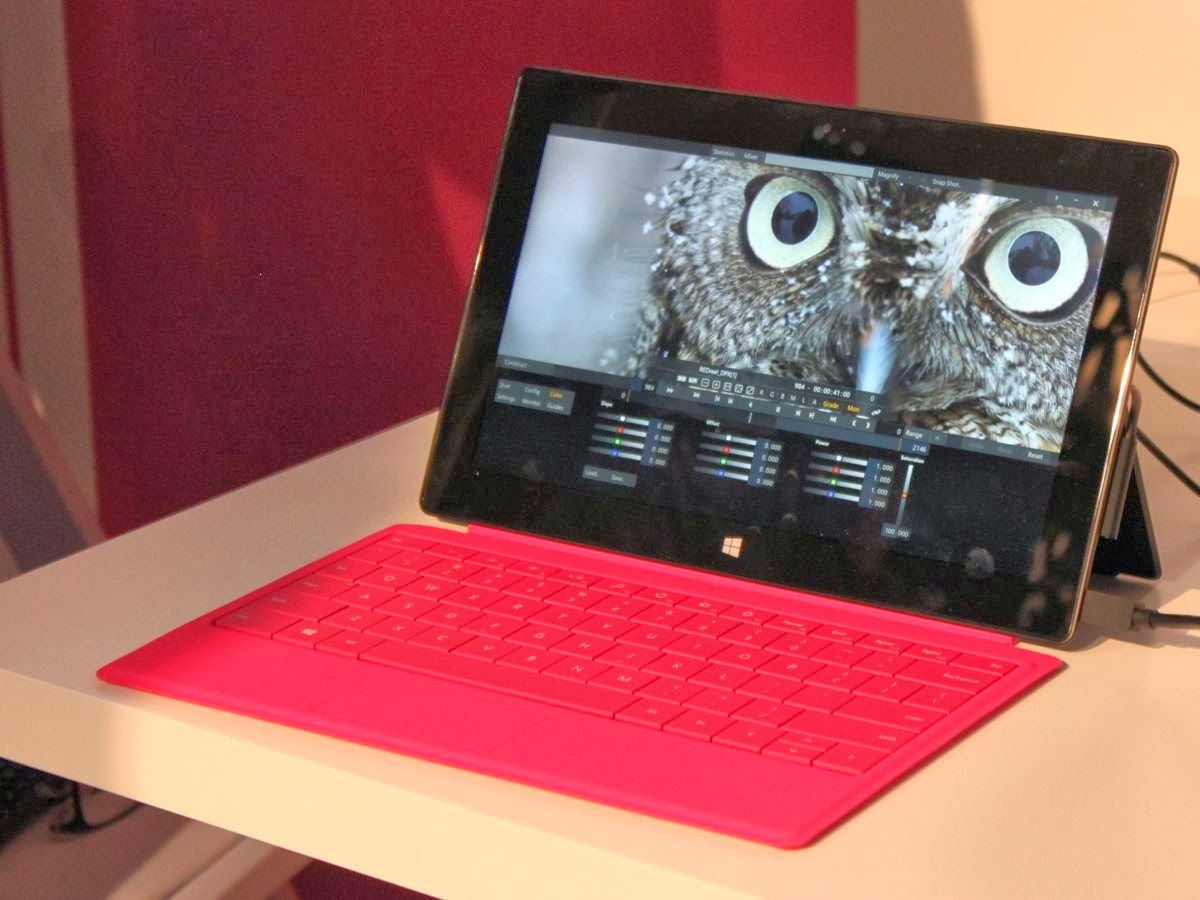
The Pro 3 looks like it’s going to improve the kickstand even more than the Pro 2 as it’s fully adjustable from 22′ to 155′. This will let you (almost) lay it down flat on a table for drawing.

If you do that, however, you might want to take a look at this review from Gabe over at Penny Arcade.

Surface Pro 2 and Surface Pro 3 Comparison: Keyboard Changes


While the on-screen keyboard is nearly identical, there has been a redesign of the type keyboard cover to lend the Surface Pro 3 more stability when being used on the lap.

Basically, they added an extra strip of magnets to allow the keyboard to grab hold of the bottom and front of the Surface. A simple yet effective solution to a major complain with the previous models regarding stability when used as a laptop replacement.

Most people who have tried it says it makes the Surface Pro 3 much more usable when resting on a lap.

Surface Pro 2 and Surface Pro 3 Comparison: Power Supply Changes


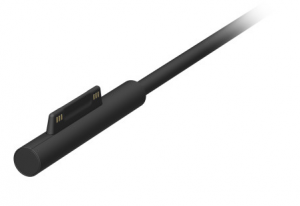
OK, this change is both good and bad. First, the good…

At only 36w, the Surface Pro 3′s power supply is less than the 48w the Surface Pro 2 required. This indicates that the power requirement for the new machine is less than its predecessor’s.

Hopefully, that translates to the longer battery life Microsoft is claiming.

The bad news is that they CHANGED THE PLUG. That means that any old or extra power supplies that you have left over from your Surface RT/2 or Surface Pro/Pro 2 simply will not work for the Surface Pro 3.

Ok, that’s it for this post. Hopefully you found it informative and helpful. In my next post, I’ll go into my opinions on if or when an upgrade to a Surface Pro 3 would be a good thing and when I think it’s unnecessary.

Download and Play Blu-ray/DVD Digital Copy movies on Microsoft Surface Pro 2

With the help of the best DRM Converter to remove DRM protection of your Digital Copy movies and convert them to best format for your Surface Pro 2.
I'm a DVD movie lover, and for exciting film, after seeing it in the cinema, I can't wait to buy the form of Digital Copy for playback on my Surface Pro 2. But I have the trouble to play DVD Digital Copy Movies on your Surface Pro 2 first? But now I have solved the problem and will share the easy solution in my article.


After serching, I find Digital Copy is a commercially distributed computer file containing a media product such as a film or music album. The term contrasts this computer file with the pysical copy (typically a DVD or Blu-ray Disc) with which the Digital Copy is usually offered as part of a bundle. It allows the disc's purchase to create a single copy of the movie on a computer, and to view it on that computer's display or an external display (e.g. television) connected to that computer.

Due to Digital Copy, people cannot put movies to their external displays. With the help of Pavtube ChewTune, I can remove the DRM protection and put my DVD Digital Copy movies on Surface Pro 2. Becides, it can deal with all my purchased DRM protected videos and movies. The conversion speed and output quality are very breathtaking. The Mac version is Pavtube Pavtube ChewTune for Mac. Below is my workflow to put and transfer DVD Digital Copy movies to Surface Pro 2 for playback.

Tips: Money saving bundles:


How to convert DVD Digital Copy movies to Surface Pro 2

Before the conversion, you must make sure two important things:

First, your computer is authorized for Digital Copy Movies, that is to say, you can play the Digital Copy Movies in your Windows Media Player.

Then, when you are installing Pavtube ChewTune, do not close the Audio Drive window.

installation to install specific audio driver

Let's start the process!

Step 1: Run Digital Copy to Surface Pro 2 Converter, import Digital Copy movies to this program from your computer.

iTunes to Surface Pro Converter

Step 2:Choose the output format for Surface Pro 2. You could choose "Windows >Microsoft Surface Windows RT/Pro H.264 Video (*.mp4)" as the most compatible format for Surface Pro 2.

Surface Pro video format

Step 3: Hit the "Convert" button on the bottom right corner to start the conversion and export DRM-free digital copy movies.

Tips:

The conversion process may be a litter longer. It would take as long as the source movie length because Pavtube ChewTune records source Digital Copy movies in 1:1 video and audio quality. During the conversion, you can do something else to spend the waiting time.

Once get the converted videos, just copy and dump them to Surface Pro 2 via USB.

Additional Tips: 

1. About ChewTune - An easy-to-use yet intuitive and stable DRM converter which can help you strip DRM protection from iTunes, Blu-ray/DVD Digital Copy movies Amazon, Zune, BBC iPlayer, Napster, Blockbuster, etc. and convert videos to all popular video formats like MP4, MOV, MKV, WMV, AVI, FLV, etc. for playing and sharing anywhere you like. The audio/video synchronization is very good and the quality of the converted videos too. It's completely free for protected Audio files. 

2. Check out "The Ways Transferring Files to Your Surface Pro 2" if you have no idea about Surface file transfer. 

Related articles:

How to Play Purchased Amazon WMV Video on Surface Pro 2

This tutorial will tell you how to convert protected WMV files purchased from Amazon Instant Video Store to non-protected video for play on Surface Pro 2. 

As an Internet video on demand service, Amazon Instant Video (formerly Amazon Video On Demand) offers television shows and films for rental and purchase. And the videos, movies, TV shows in the Amazon Instant Video Store are encoded with .wmv video file format.

The copyright of WMV files are protected by DRM copyright protection and can only play on specified media players like Windows Media Player, Amazon Unbox Player, Zune Digital Media Player, etc. Unfortunately, Surface Pro 2 doesn't support DRM files.

If you want to play your Amazon WMV videos on Surface Pro 2, first you need is to remove DRM from Amazon WMV files and convert them to Surface Pro 2 compatible video formats(MP4 with H.264 video codec is highly recommended). Below, I will throw a quick tutorial up, guaranteed to get Amazon WMV videos, movies to play on Surface Pro 2.

Get Rid of DRM and Convert Amazon WMV video for Surface Pro 2 playing back


At first, Pavtube Chewtune is the best tool to help you get rid of DRM protection from Amazon Instant Videos store. (Mac Version: ChewTune)


How to remove DRM protection and Convert/Record Amazon Instant Videos to Surface Pro 2?


Note: The first and most important thing is to make sure that your computer authorized for source Digital Movies, that is to say you can play the Amazon videos and movies in your Windows Media Player.

Run the Chewtune and load the source videos and movies you want to convert to the program with the "Add video" or "Add from Folder" button.


Choose suitable output format for Surface Pro 2. In Pavtube Chewtune, the best output format is "Microsoft Surface Windows RT/Pro H.264 Video (*.mp4)


Tip: If you want some specific settings to your output videos and movies, you can click "Setting" to set the output profiles such as size, Bitrate, frame rate and so on. Notice that the higher video bitrate will produce the large output file size.


After finishing these steps, Just waiting the conversion. Remember that the conversion time is related to the source movie length because Pavtube Chewtune records source DRM videos in 1:1 video and audio quality. Let’s synchronize media contents to your Microsoft Surface Pro 2 and enjoy movies on Surface Pro 2!

Related Articles:

Playing Blu-ray movies to Surface Pro 2 and Surface 2 
How to view DVD movies on Surface 2 and Surface Pro 2? 
Watch DVD ISO/IFO images on Surface 2 & Pro 2 with multi-track MP4 
Puting and Playing Tivo files on Surface Pro 2 or Surface 2 effortlessly 
How to transfer MKV, AVI, VOB, Tivo, WMV, MPG, MTS, FLV/F4V videos to Surface 2? 

Get more coupons:

Video Converter Ultimate($65) + Vidpie($29) = Only $74.9, Save $19.1 
ByteCopy($42) + Vidpie($29) = Only $54.9, Save $16.1 
BDMagic($49) + Vidpie($29) = Only $49.9, Save $28.1 
DVDAid($35) + Vidpie($29) = Only $49.9, Save $14.1    

DVD to Windows 8.1- How to Rip and Convert DVD to Surface Pro 2

In this tutorial, you can get a brief guide which shows you an easy way to load movies from DVD discs and onto your Microsoft Surface Pro 2 tablet for playback with ease. 
The Surface Pro 2 really is identical to the original Pro; it thinner or lighter, as far as we could tell. This Windows 8.1 Tablet remains impressively responsive when opening, closing, and switching between apps and its new 1080p display (the same as in the Surface 2) looks fantastic.


However, just like other tablet PCs, the Surface Pro 2 tablet doesn't have a DVD-ROM for playing DVD movies. To get your favorite DVD movies into Surface Pro 2 for amusement, you need to convert DVD to Surface Pro 2 supported video format first and then transfer the result videos to the Windows 8.1 tablet.

This tutorial is about how to convert DVD to Surface Pro 2 highly compatible video format easily and fast so that you can watch DVD movies on Microsoft Surface Pro 2 Tablet with best HD video quality.

To accomplish this goal, a professional powerful ripping program will help you a lot. Pavtube DVD to Surface Pro 2 Converter is such a tool with the easiest workflow to help you rip off DVD disc/ISO/folder protection, then convert the decrypted movie to MP4 format with best video settings for Surface Pro 2. Get DVD to Surface Pro 2 Converter for Mac here; well support Mac Mavericks!

(Download the DMG file for Mac OS X 10.5 Leopard)

How to convert DVD movies to Microsoft Surface Pro 2

Step 1.
After the installtion of the 30% off Surface DVD Ripper, Click the “Load DVD” button to choose and import DVD movies from your computer’s DVD-ROM.


Step 2. Click “Format” bar, follow “Windows > Microsoft Surface Windows RT/Pro H.264 Video (*.mp4)”. The output videos fits Surface Pro 2 tablet just right.


You can also click “Settings” to manually change the video encoder, resolution, frame rate, etc. as you wish. (Optional)

Tip:
1. If you want to convert blu-ray/dvd to 3D videos or transcode Blu-ray/DVD to MP4 with multiple audio and subtitle tracks, try Pavtube ByteCopy and ByteCopy for Mac.

2. If you are Surface 2 users, learn how to move DVD movies to Surface 2 for enjoying.

Step 3. When all is OK, click “Start” to rip DVD for Surface Pro 2. After the ripping, you can click “Open” to locate the converted MP4 video files and just transfer them to your Windows 8.1 Surface Pro 2 for watching anywhere!

See also:
Convert ISO/IFO file to Surface RT/Pro
Watching Blu-ray movies on Surface 2
How to convert HD videos to Surface 2
Rip DVD movies to watch on Surface 2/Pro 2
Play "Iron Man 3" DVD IFO ISO file on Surface 2
Transfer Blu-ray ISO images on Surface 2, Surface Pro 2

Tricks for playing Blu-ray movies to Microsoft Surface Pro 2

This is simple guide for ripping and putting Blu-ray onto Microsoft Surface 2 tablet for enjoyment on the go. Let’s find the easy way to play blu-rays on Surface 2 out here!

The Surface 2 has a breakthrough on chipset- it adopts the most powerful nVidia Tegra 4 which 2GB RAM; It has great improvement in resolution- the 10.6-ich model has 1920*1200 resolution which must be persuasive that Surface 2 would be your best choice to play your collection of video file with high quality.

With a Surface 2, what if you simply want to play a Blu-ray on the powerful Windows 8.1 RT tablet? As you know, Windows 8.1 does not have the DVD, BD support function built into it, and frankly, there’s not a quick and easy way to do it. You need special software to accomplish it. Here I will give you a relatively easy solution for copying Blu-ray to Surface 2 tablet.


blu-ray to surface pro 2

There are many programs out there that allow you to make copies of your Blu-rays and let you watch them the way you want to play them. You may be confused about choosing a most suitable tool. If so, I recommend you try Pavtube Blu-ray to Surface 2 Ripper. It is easy to use for editing and conversion and makes great quality copies of my Blu-rays.

To be honest, the Blu-ray to Surface 2 Converter can help you rip and convert all the Blu-ray/DVD Discs even iso/ifo image files. I’ve been using the program to convert all my Blu-ray discs to Surface 2 playable video files. I’ve found the quality to be excellent, and see no difference when compared to playing the discs themselves. Meanwhile the audio/video synchronization is very good, the size of the subtitles too.

If you’re a Mac user, please turn to the equivalent Mac version – Surface 2 Blu-ray Ripper for Mac, which can transfer Blu-ray and DVD movies to Surface 2 tablet on Mac OS X (Mac OS X 10.9 Mavericks and Mountain Lion included).

Tips:

If you want to keep multiple audio tracks (language) and subtitles, do not miss this Blu-ray to Surface 2 Ripper Pro!

Tutorials: How to transfer Blu-ray to Surface 2?

Step 1. Run Blu-ray to Surface 2 Converter; load Blu-ray.

This converter does not only support Blu-ray disc/folder/ISO, but also able to convert DVD disc/folder/ISO/IFO files. Your ISO image file would be recognized automatically so there’s no need to run virtual drive to mount it any more.

blu-ray to surface pro 2


Step 2. Choose format.

Click the drop-down list besides “Format” list, you can find many presets and columns for different devices and programs. Let’s switch to “Windows” column and select “Microsoft Surface Windows RT/Pro H.264 Video (*.mp4)” as the best preset for Surface 2.

Or you can enter “Surface” in the small search box at bottom right corner.

blu-ray to surface pro 2

Step 3. Adjust specs or edit video before conversion (Optional).

If you want to customize output video size, bitrate, frame rate and others, just click “Settings” to enter profiles settings window.

And you can click the pencil-like icon on the top to crop, trim, edit audio/subtitles/ or add watermarks before conversion.

Step 4. Start conversion.

Now hit the big red “Convert” to start converting Blu-ray movies to MP4 with best settings for playback on Surface 2.

After the conversion, you can get the converted Blu-ray rips in .mp4 format by tapping the “Open” button. Now transfer video files to your Surface 2.

Related Articles:

Remove DRM from Amazon WMV Videos to Surface 2 and Surface Pro 2
How to Put 1080p Videos, DVD, Blu-ray movie to Surface 2 & Surface Pro 2
Watch DVD movies on Surface 2 in multi-track MP4
Play Digital Copy movies on Surface Pro 2 and Surface 2

Start and find Surface Apps for Trips

Here are recommended apps for trips with your Surface tablet.


If you’re planning a trip and you’re going to take your Surface, I have some recommendations for which travel apps you should take. I picked these apps for their entertainment and utility value, whether you are on a trip for business or pleasure.

All of these apps will work on either a Surface RT/2 or Surface Pro/Pro2.

 Skype: If you don’t want to blow your cell minutes checking in with the kids, you can always use Skype to connect anywhere you can get a network connection to any other computer in the world. Best thing is it’s free. And if you bought a Surface 2 tablet, you can turn to free Skype.


   Netflix, HuluPlus, Crackle: So long as you have WiFi in your hotel room or at the airport, it might be nice to watch some TV/Movies. If you have a Netflix/Hulu+ subscription, these apps are invaluable. Be aware, though, if you’re outside of the US/Canada, you may not be able to connect due to country restrictions. However, you can use a DNS Proxy (http://www.smartdnsproxy.com/, for example) to bypass those restrictions and stream your movies. There is a cost but it’s usually very inexpensive (around $5 USD/month.)

 Kindle: There’s few things better than reading a good book to relax. With Kindle, you can take a whole collection of books with you while avoiding the outrageous overweight baggage fee.

  Boingo: This app will help you find WiFi hot-spots. It’s not perfect and works best in the US/Canada, Europe and, Japan/China but if you don’t know the area you’re in, it might help. I’m hoping it will work in Panama.

 Flight Locator: This app will help you track your flights during the layovers or if you’re getting ready to head to the airport. In addition, you’ll need to know the flight numbers for the planes you want to track but it’s free and very handy at airports.

 Network Speed Test: This handy little app will test the speed of the WiFi you’re connecting to. This can save you a lot of frustration if you know your hotel connection isn’t quite fast enough to let you stream Netflix movies up front instead of having it stop to buffer every 12 seconds during a good scene.


Hopefully, you found this list handy. I know this isn’t a super advanced topic and that you probably already had some of these apps installed but, maybe, I gave you an idea or two on how to make your next trip a little easier or more fun.

Oh yeah, one very important non-app item. Before you head out on your trip….. MAKE SURE YOU HAVE YOUR CHARGER. Unlike the iPad/iPhone chargers, there aren’t a million knock-offs that you can buy at any corner gas station (at least not yet).

If you have any apps you think I missed, please let me know.